How to deploy your nuget packages locally
December 30, 2014 by Anuraj
.Net ASP.Net ASP.Net MVC Visual Studio
In ASP.NET 5, everything is nuget package. If you are developing a class library, that is also has to be a nuget package, which you can add as dependency in a different project.json file. This post will help you to build nuget package and deploy it locally.
To build nuget package, you need to use the kpm build command, which will compile the project and build a nuget package based on frameworks key in the project.json. If you have both ASP.NET 5 CLR framework and cloud optimized CoreCLR framework included, kpm will build nuget package for both frameworks.
To deploy nuget packages locally, open Visual Studio. Select Package Manager Settings from Tools > NuGet Package Manager menu. It will display the Visual Studio options dialog. Select the Package Sources item.
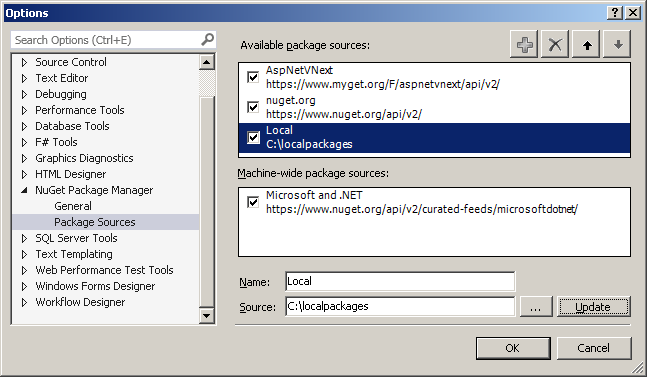
In the Window, click on + button. Now select the newly added item and modify the name and location, you can provide folder locations here.
Now add dependency of your nuget package in project.json, run kpm restore command, it will look for the package in the locally configured directory as well. You can also modify the NuGet.config file directly from %AppData%\Nuget\ location, if you don’t like Visual Studio GUI ;)
You can find more details about creating and deploying nuget package from NuGet official documentation
Note: You don’t need to create NuGet package while developing the application, you can do it with project.json file. If you keep the project.json file in the same directory level, runtime will pickup the class library automatically.
Happy Programming :)
Copyright © 2024 Anuraj. Blog content licensed under the Creative Commons CC BY 2.5 | Unless otherwise stated or granted, code samples licensed under the MIT license. This is a personal blog. The opinions expressed here represent my own and not those of my employer. Powered by Jekyll. Hosted with ❤ by GitHub