How to Build an Email Sentiment Analysis Bot - Using Logic Apps
March 13, 2021 by Anuraj
Azure Serverless Cognitive Services
This article discuss about how to build an Email Sentiment Analysis Bot with the help of Azure Serverless tools and Azure Cognitive Services. You can build such tool by writing code with the help of Azure Functions and with no code using Azure Logic Apps. In this post you can find the implementation using Azure Logic Apps, in the next post, you will be able to find the same implementation using Azure Functions.
How it works
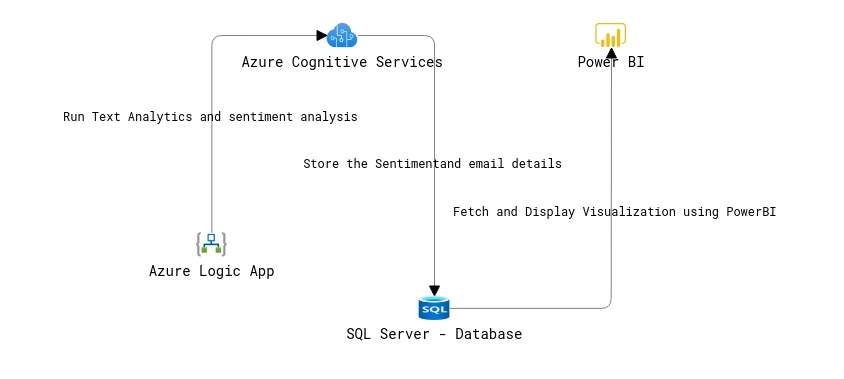
The working is simple and straight forward. When ever you receive an email in your inbox - extract the body of the email, run sentiment analysis using Azure Cognitive service and save it in the data store for visualization or you can notify your team with the help of Push Notifications or SMS. Here is the high level architecture of the implementation.
No code or Low code implementation
In this implementation, you will learn how to build a service with Azure Logic Apps. Logic Apps allow developers to design workflows that articulate intent via a trigger and series of steps, each invoking an App Service API app whilst securely taking care of authentication and best practices like durable execution.
The Logic App will be the first module - which will triggered when an email received on your inbox. Then the Logic app will extract the body and execute sentiment analysis using Azure Cognitive services. Once sentiment analysis performed, the data is stored in SQL Server database for visualization. You can also integrate with Push Notification or SMS using API services like Twilio.
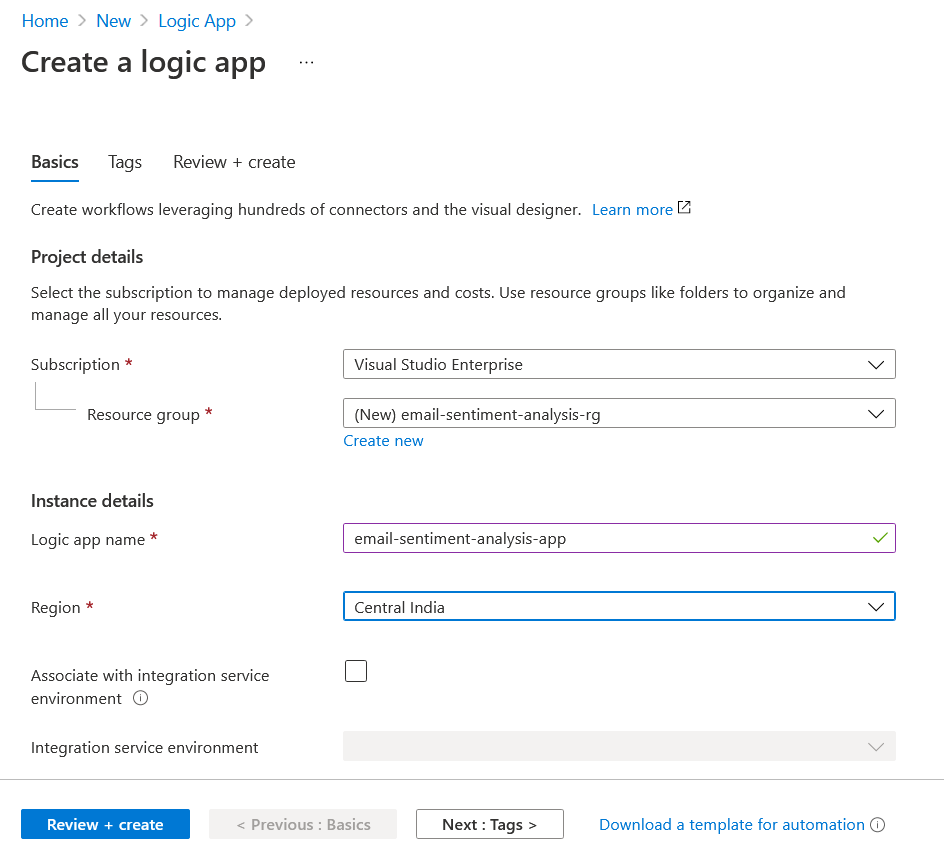
To create a logic app, click on the New Resource button, search for Logic App and choose Logic app from the List. You need to provide the resource group, Logic App name and Region.
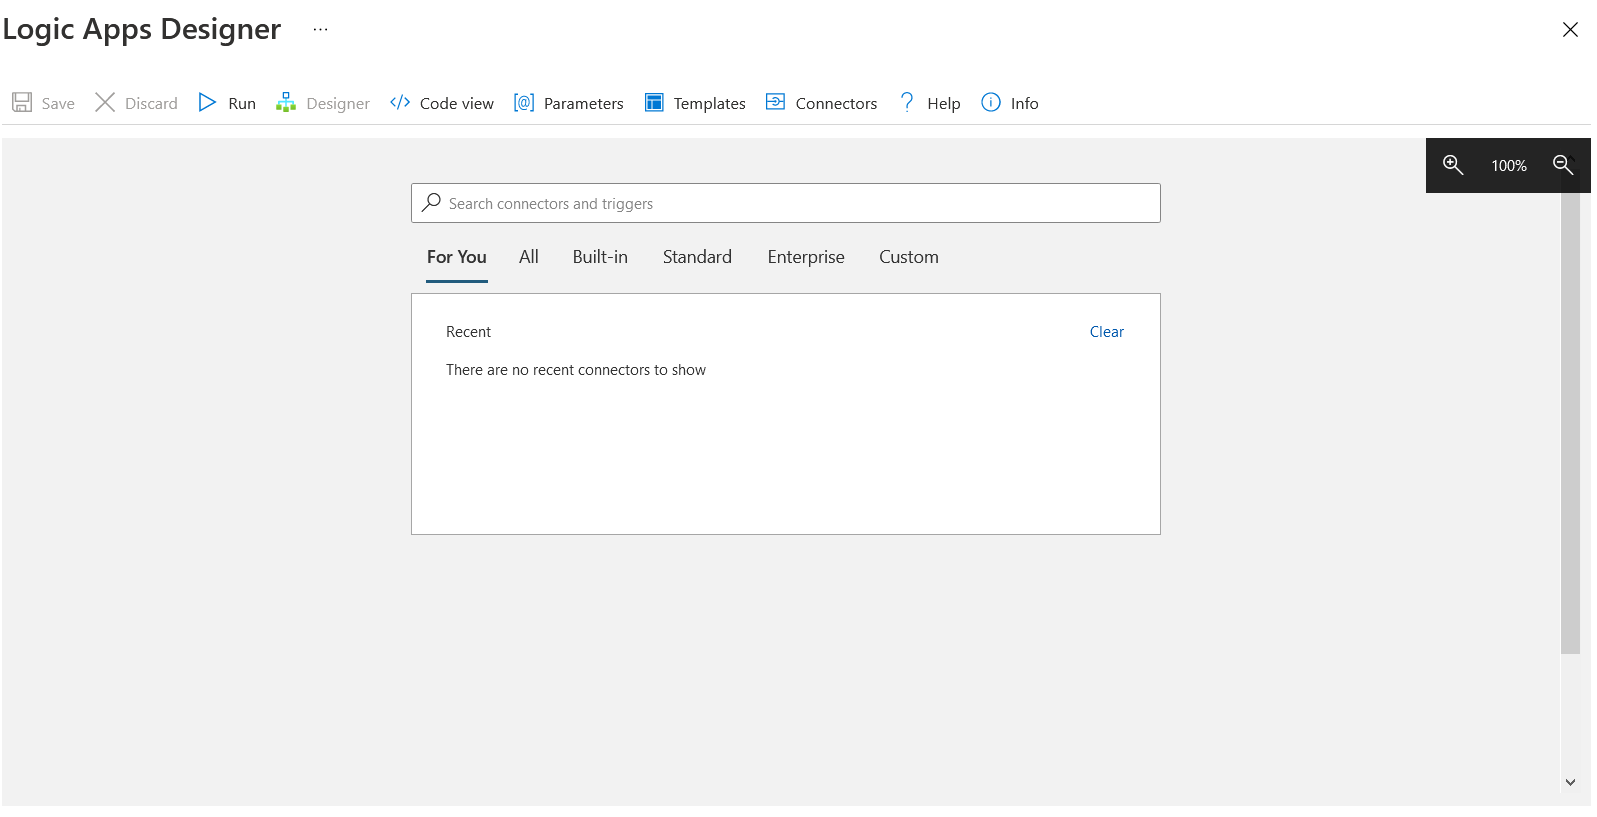
And you can click on Review and Create button. Once Logic App is created, you will be redirected to Logic App Designer. Click on Blank Logic App option to start creating the app.
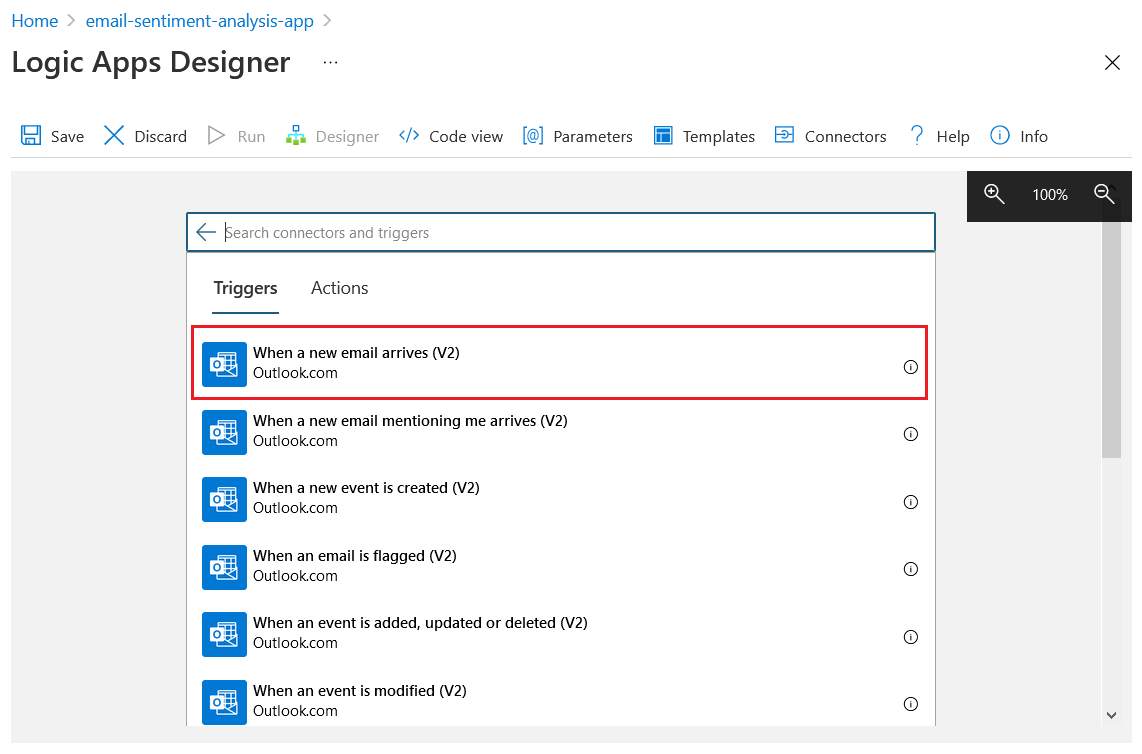
Next you need to create a trigger, you can search for the a mail provider. You can search for Gmail or Outlook. If you choose Outlook.com, you can select the trigger option like when a new mail arrives.
Once you choose it, you need to Sign in to your Outlook.com account. Once you complete the Authentication, you need to authorize the Logic App to access your Outlook account. Once it is successfully authenticated and authorized, you can view your inbox and other folders you created in your Outlook.com.
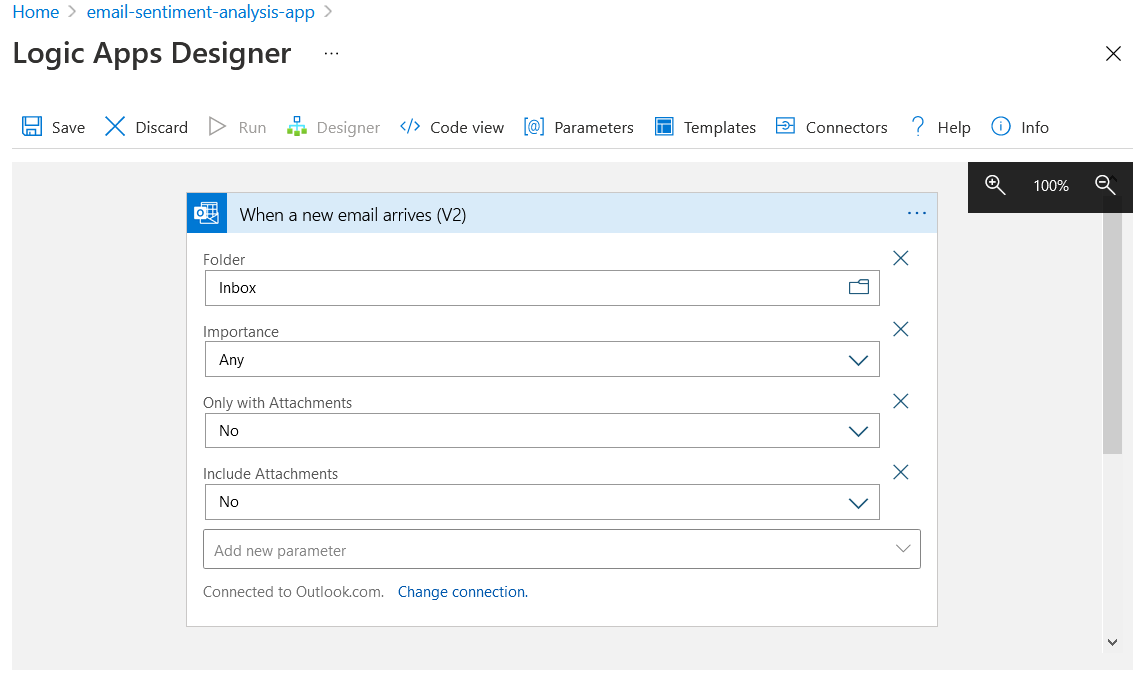
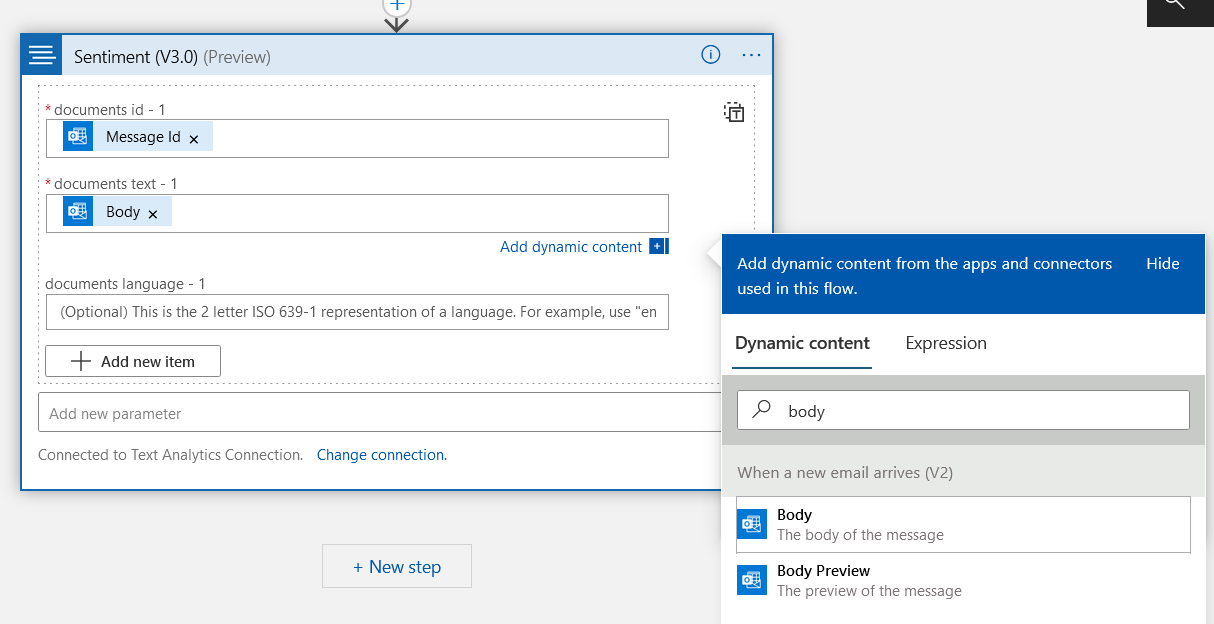
You can configure various options like which folder, importance, only with attachments etc. Once it is done, you can click on the Next Step button. In the Choose operation, search for Cognitive services and select Text Analytics. Once you select the Text Analytics, you can select Sentiment (v2.0) or Sentiment (v3.0) (preview).
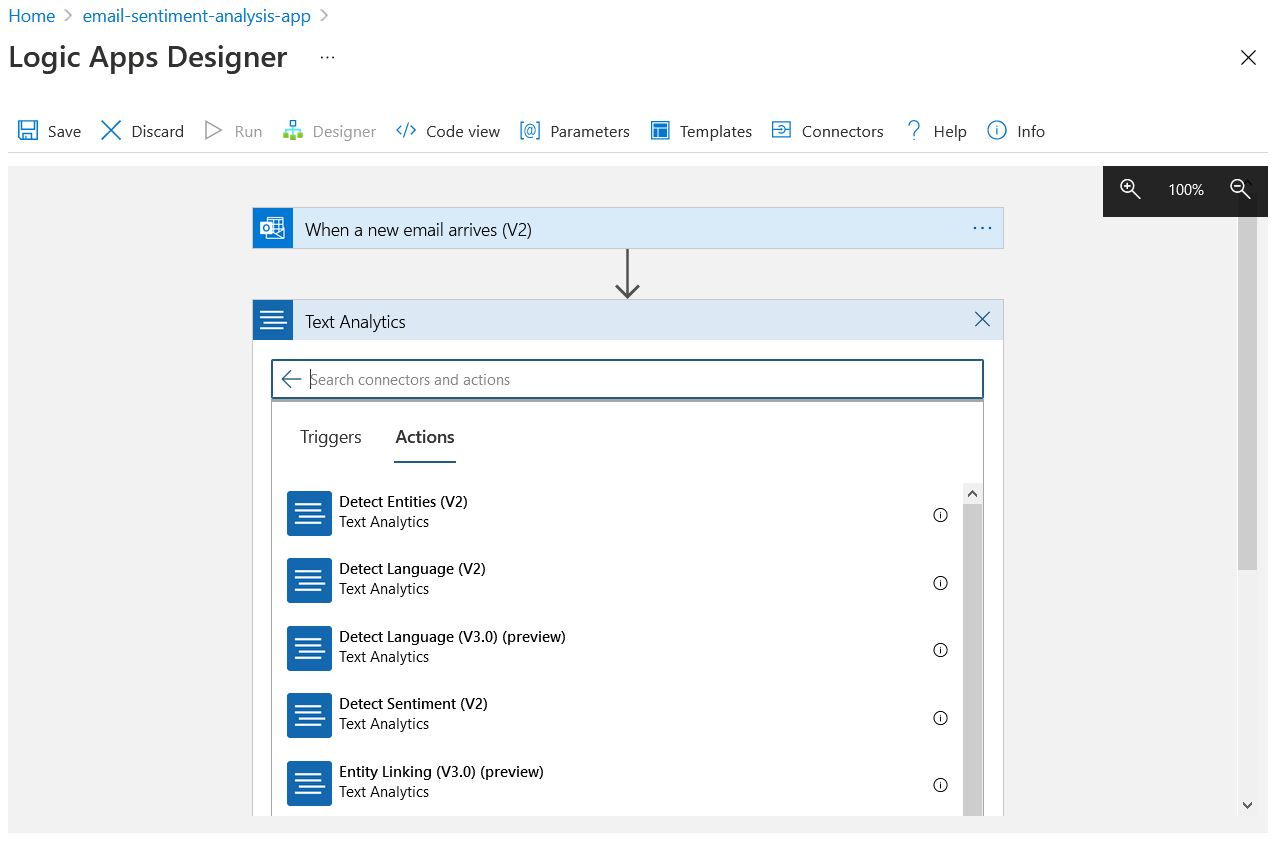
And you need to configure Text Analytics API Key and resource URL. Since you didn’t created the Text Analytics, you need to create a Text Analytics resource. Open azure portal on new tab, click on new resource, search for Text Analytics and create a new Text Analytics resource.
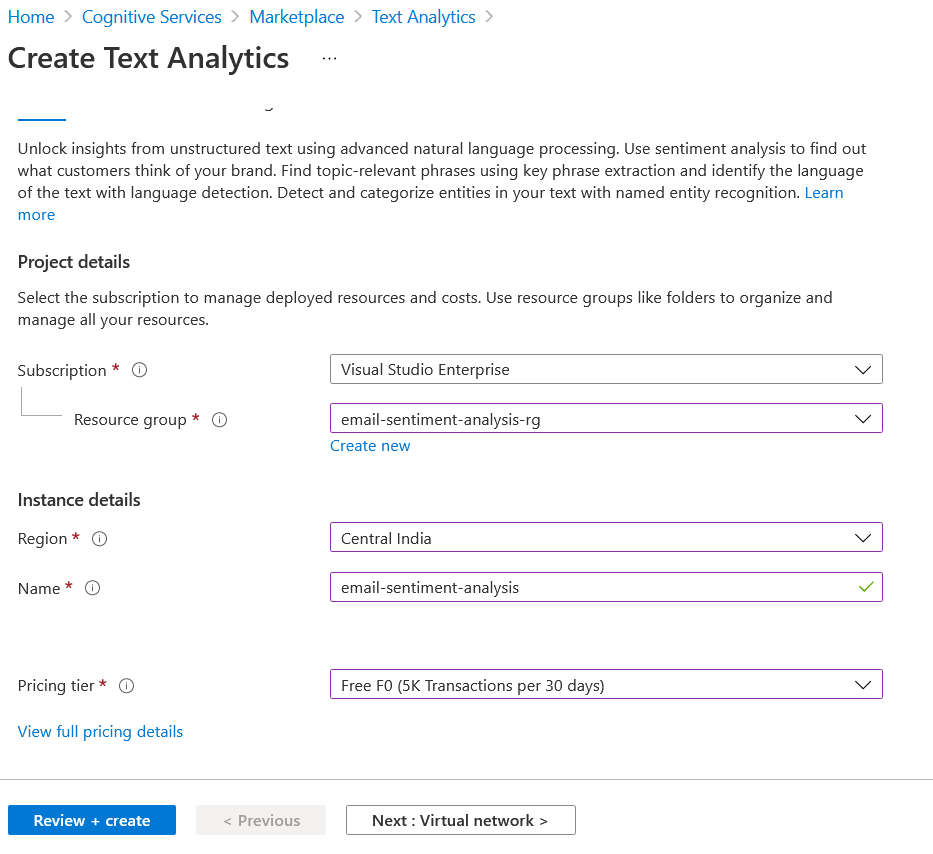
Similar to other resources, you need to configure name, resource group and region. Once you configured, click on Review and Create and create the Text Analytics resource. Once it is created, you can select the Keys and Endpoint blade and copy the Key and Endpoint URL.
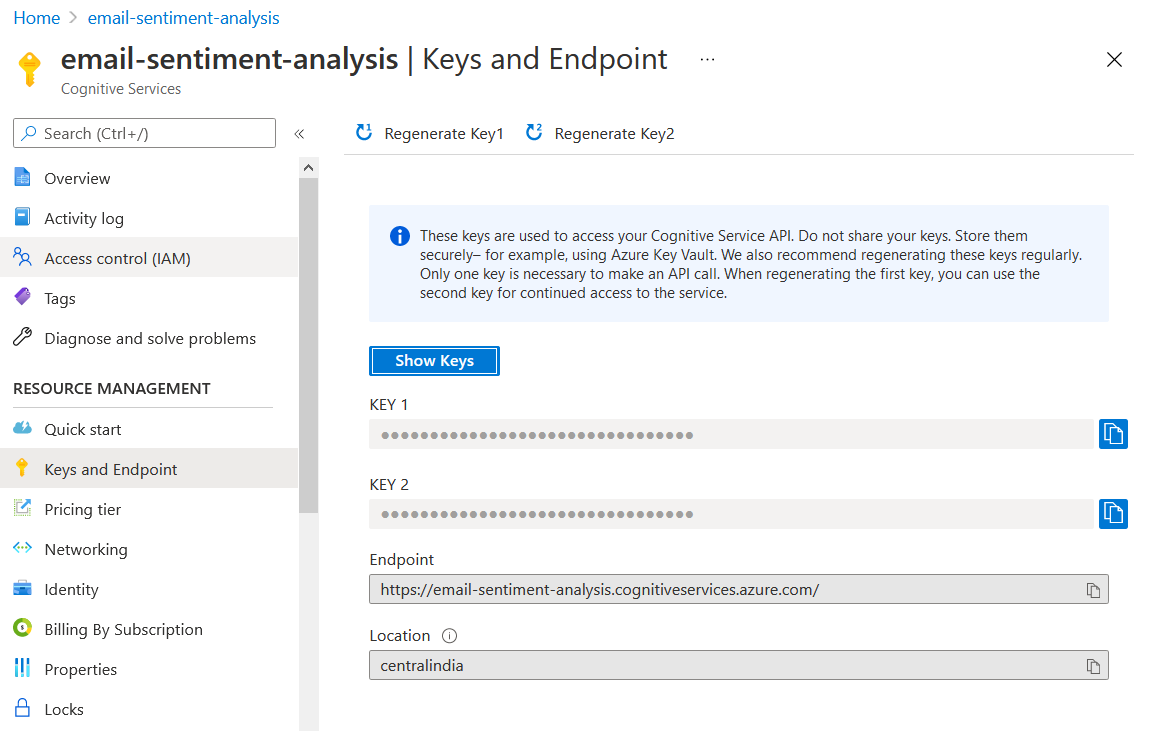
And provide the key and endpoint url in the Logic App configuration. Once you configure the API Key and endpoint URL, you need select the documents dropdown. Once you select the option, configure subject and body from the email trigger step.
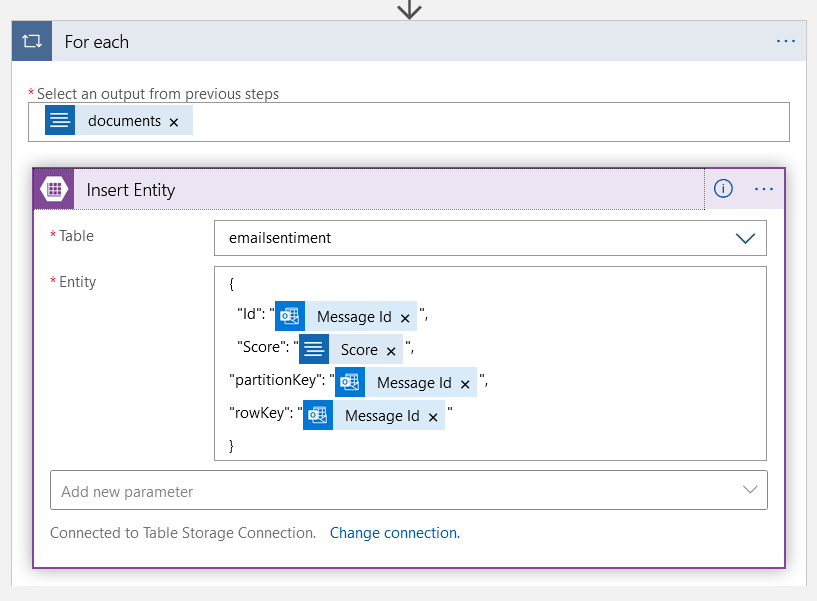
Next you need one more step which will store the data, you can use your favorite storage medium, in this blog Azure Storage Account is used. You need a table in azure storage account - it can be a empty table without any schema. So you need to click on Next step button on the designer and search Azure Table Storage, once you selected it, click on Insert Entity option. Once you selected, you need to create a connection to azure storage account, you can do it using the name and key of azure storage account. If your location contains any storage account it will be auto populated or you can manually enter the connection details.
Since you configured documents option, which is an array in the Detect Sentiment screen, the output of the Step is also will be an array. So when you choose the Insert entity values, Logic App will automatically configure a for loop for your insert. And you need to configure RowKey and PartitionKey values for the entity to insert. So the Insert action will look like this.
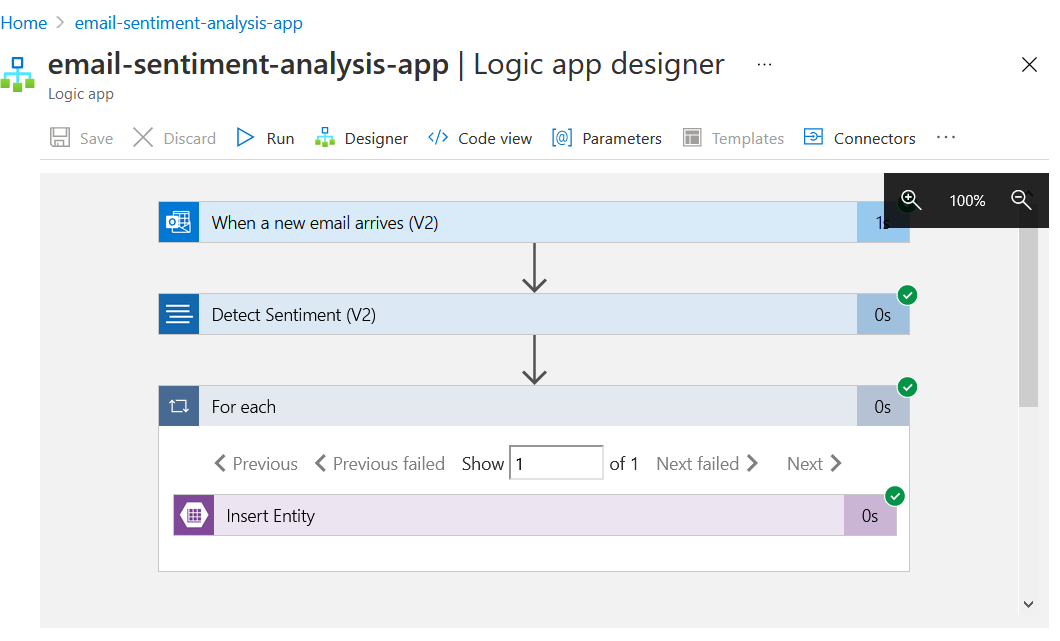
Now you completed the configuration. You can save the Designer and Run the Logic app. Once you receive an email in your inbox logic app will trigger, run the sentiment analysis and store the data in azure table storage. Here is an example of the run.
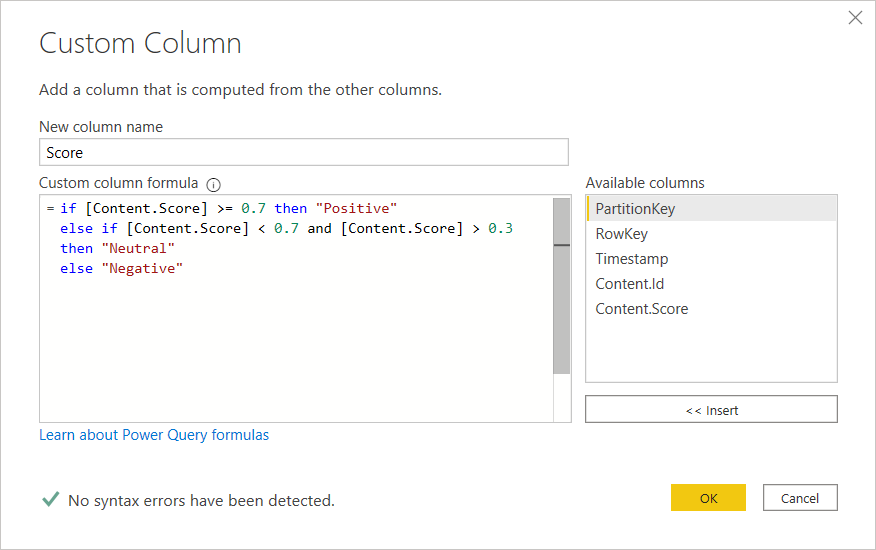
Next for Visualization, you need to open Power BI. And click on Get Data from another source... link, from the dialog choose Azure Table Storage. You can connect to the table storage from PowerBI using account name and key. And you need to add one more column which helps you to display the sentiment based on the score. You can add a custom column with following logic.
if [Content.Score] >= 0.7 then "Positive"
else if [Content.Score] < 0.7 and [Content.Score] > 0.3 then "Neutral"
else "Negative"
This code you can apply in the Custom Column editor.
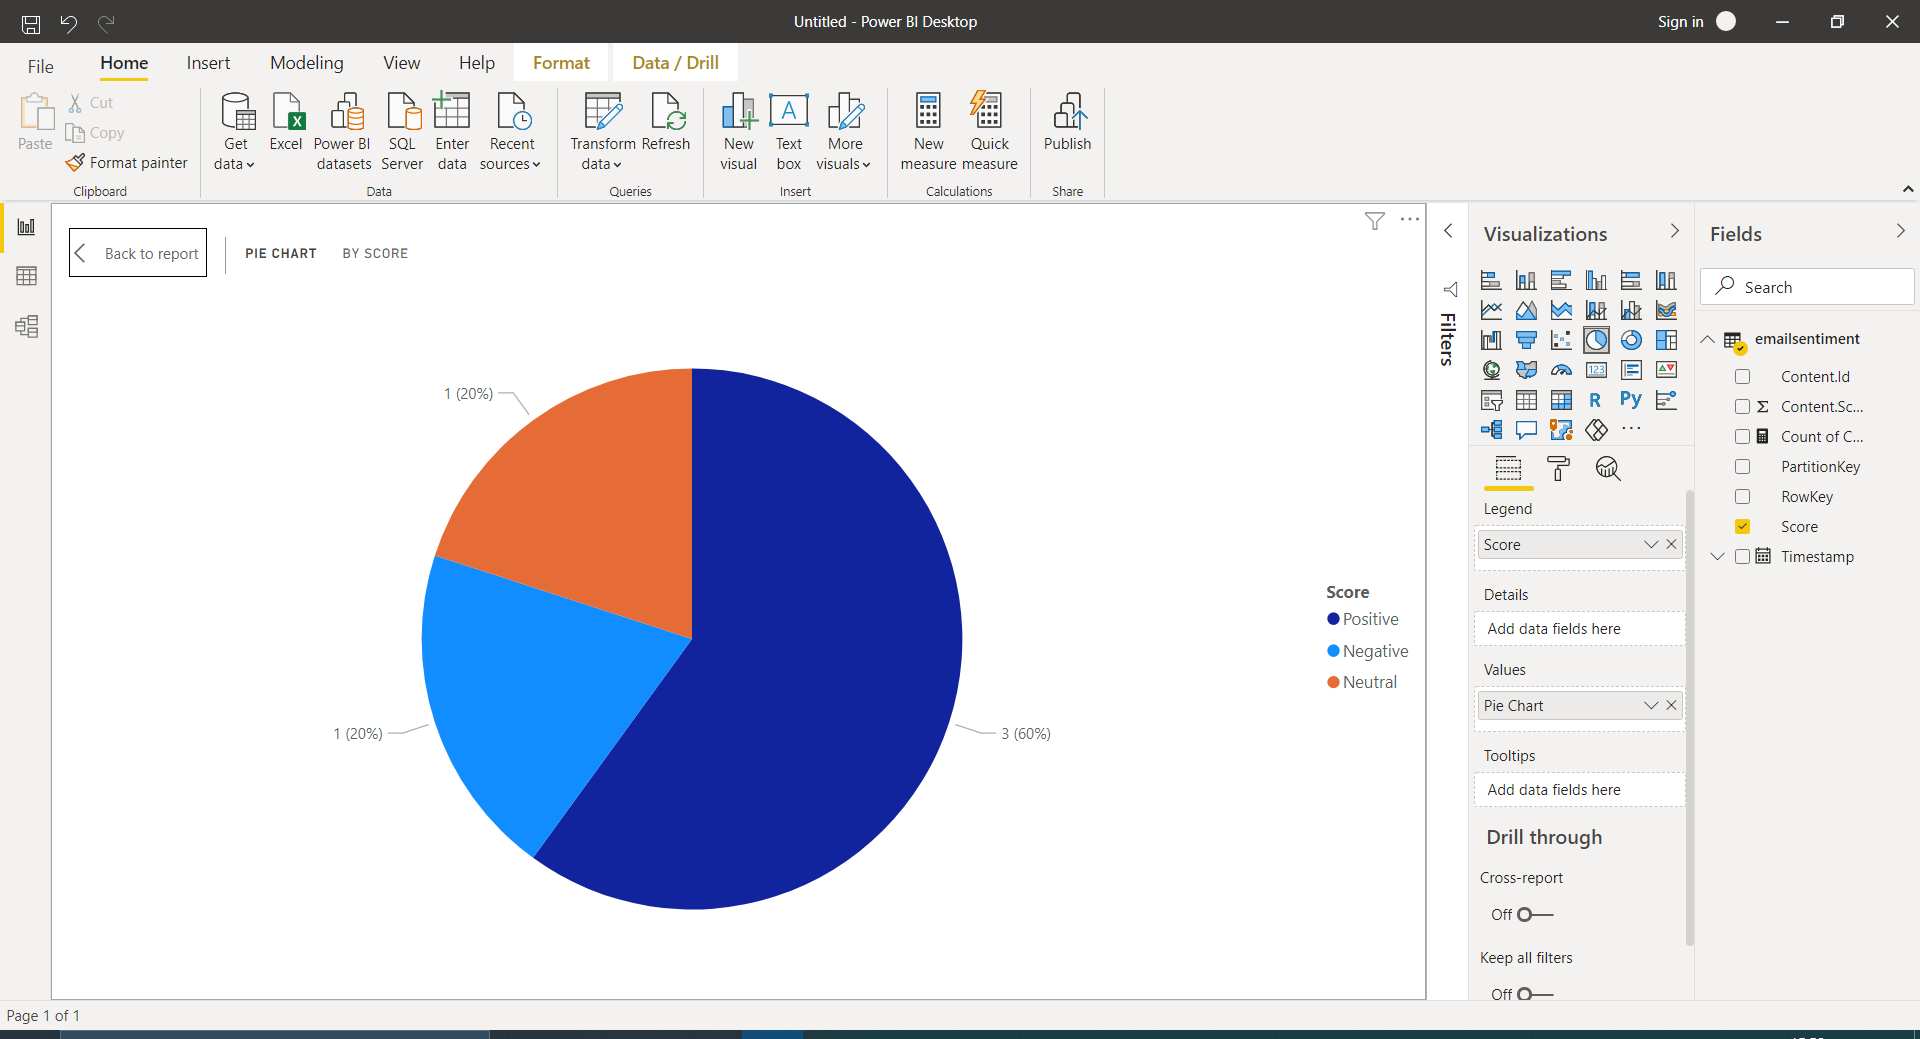
And you can add Pie Chart and drag the Score field to the values. Then it will display a Pie chart with the values. Here is the email sentiment visualization using Power BI.
In this post you understood the email sentiment analysis and visualization using No code or Low code tools like Azure Logic Apps, Azure Cognitive Services and Power BI. In the next post you will learn about how to implement same application using Azure Functions. For Text Analytics there are some limitations like maximum number of characters is supported is around 5K. If you try to run sentiment analysis on a long email, this might fail. You will learn how to solve this problem in the Azure Functions implementation.
Happy Programming :)
Copyright © 2024 Anuraj. Blog content licensed under the Creative Commons CC BY 2.5 | Unless otherwise stated or granted, code samples licensed under the MIT license. This is a personal blog. The opinions expressed here represent my own and not those of my employer. Powered by Jekyll. Hosted with ❤ by GitHub