End to end testing web apps using Playwright and Azure DevOps
July 13, 2021 by Anuraj
Playwright AzureDevOps
This article will discuss about testing web applications with the help of Playwright.NET. And run the tests in Azure DevOps as part of CI/CD pipeline. Few months back I wrote an article on Testing Web Applications with PlayWright and C#, this was using a non Microsoft package - PlaywrightSharp. Right now Microsoft is offering an official package - Microsoft.Playwright. In this article you will learn about how to write test case using Microsoft.Playwright nuget package and how to deploy the test app and execute it as part of the CI / CD pipeline in Azure DevOps.
To get started, you need to install the playwright CLI. You can do this by executing following command - dotnet tool install --global Microsoft.Playwright.CLI. Once you install the CLI you can use the CLI tools to download browsers. It is required only once for project. You can also this tool to record the tests.
To create your first test execute the following command - dotnet new nunit. Next you need to add two nuget package references - Microsoft.Playwright and Microsoft.Playwright.NUnit. After installing the packages the project file will look something like this.
<Project Sdk="Microsoft.NET.Sdk">
<PropertyGroup>
<TargetFramework>net5.0</TargetFramework>
<RootNamespace>Playwright_Demo</RootNamespace>
<IsPackable>false</IsPackable>
</PropertyGroup>
<ItemGroup>
<PackageReference Include="Microsoft.NET.Test.Sdk" Version="16.10.0" />
<PackageReference Include="NUnit" Version="3.13.2" />
<PackageReference Include="NUnit3TestAdapter" Version="4.0.0" />
<PackageReference Include="coverlet.collector" Version="3.0.3" />
<PackageReference Include="Microsoft.Playwright" Version="1.12.2" />
<PackageReference Include="Microsoft.Playwright.NUnit" Version="1.12.2" />
</ItemGroup>
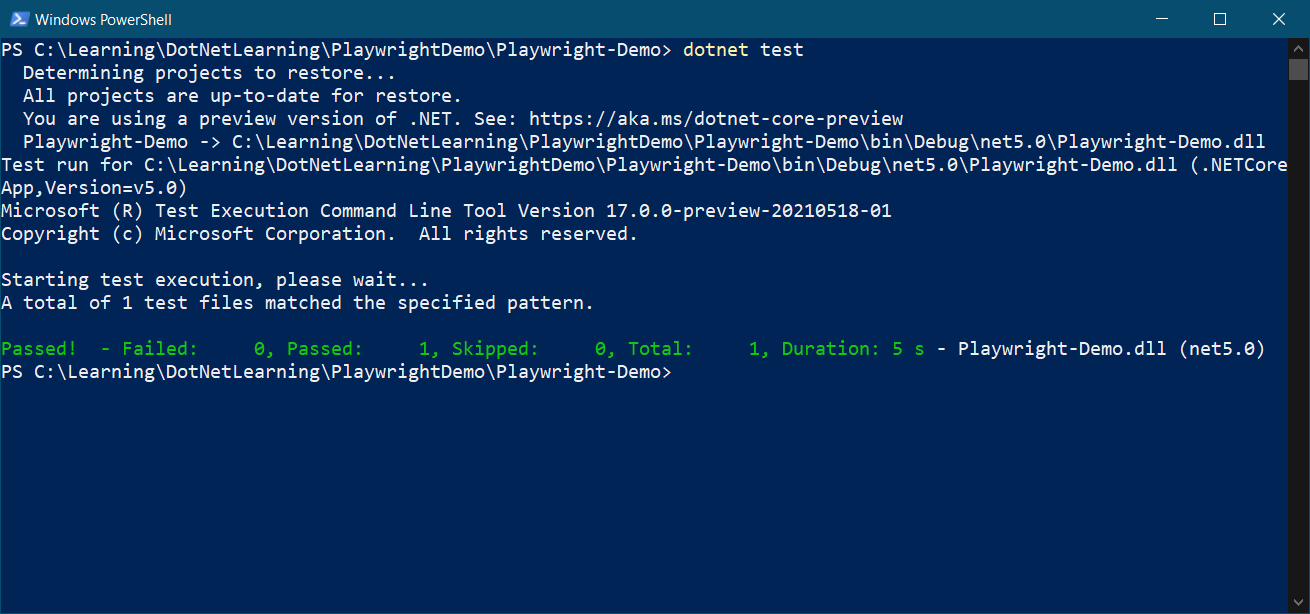
</Project>Next let’s write our first test case. In this test I am opening the https://playwright.dev/dotnet url. Toggling the dark mode checkbox and verifies whether the page switched to dark mode or light mode.
[Test]
public async Task VerifyThemeChanged()
{
    using var playwright = await Playwright.CreateAsync();
    await using var browser = await playwright.Chromium.LaunchAsync();
    var page = await browser.NewPageAsync();
    await page.GotoAsync("https://playwright.dev/dotnet");
    await page.WaitForLoadStateAsync(state: LoadState.DOMContentLoaded);
    var currentTheme = await page.GetAttributeAsync("html", "data-theme");
    await File.WriteAllBytesAsync(Path.Combine(Directory.GetCurrentDirectory(),
        "before-theme-change.png"), await page.ScreenshotAsync());
    await page.ClickAsync("[class=\"react-toggle-track\"]");
    var changedTheme = await page.GetAttributeAsync("html", "data-theme");
    Assert.AreNotEqual(currentTheme, changedTheme, $"Theme did not change");
    await File.WriteAllBytesAsync(Path.Combine(Directory.GetCurrentDirectory(),
        "after-theme-change.png"), await page.ScreenshotAsync());

    TestContext.AddTestAttachment(Path.Combine(Directory.GetCurrentDirectory(),
        "before-theme-change.png"), "before-theme-change.png");
    TestContext.AddTestAttachment(Path.Combine(Directory.GetCurrentDirectory(),
        "after-theme-change.png"), "after-theme-change.png");
}
I am also taking before and after screenshots of the page and adding as attachment to TestContext which will help to verify the screenshots in case of failure. Next you need to build the project using dotnet build command. After build you can install the browsers using playwright install command. And to run the test you can use dotnet test command - which will display results like this.
Next to record a test you can run playwright codegen command. This command will launch the Playwright recorder window and a chromium window. You need to provide the URL of the site you like to test in the browser and you can click and record the steps. The explore option text box will help you to find elements with XPath or Regex in the Html code.
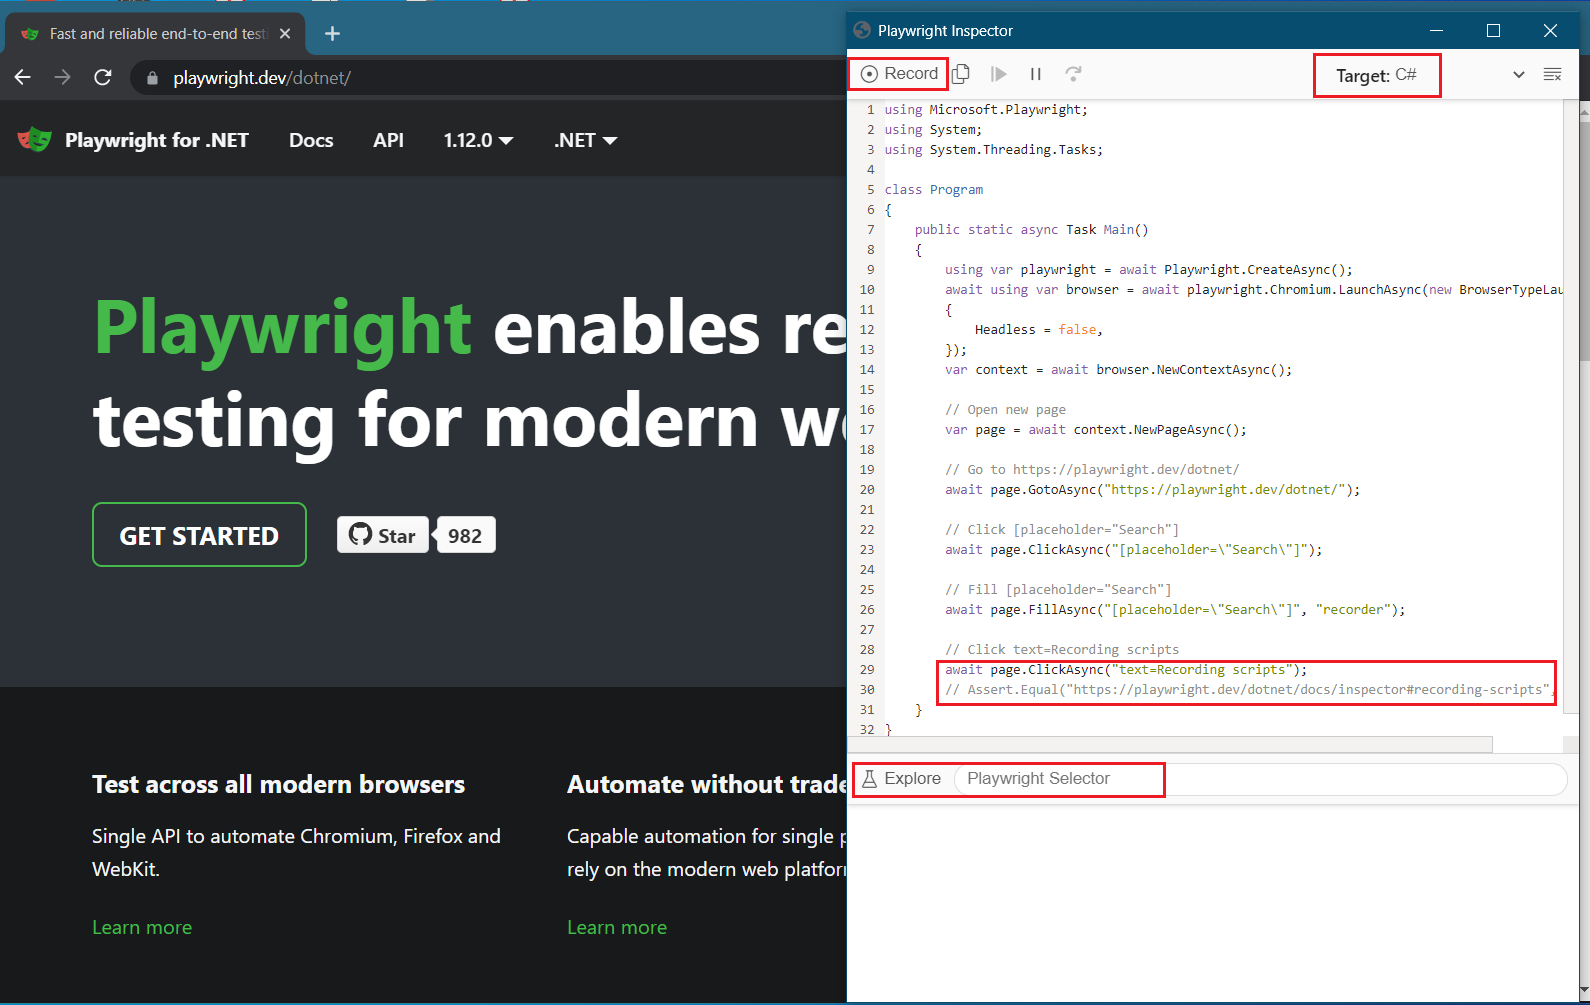
Recorder will also give some pseudo assert statements as well. You can copy the code statements and execute it as part of the tests. Here is the one test I recorded using the tool.
using var playwright = await Playwright.CreateAsync();
await using var browser = await playwright.Chromium.LaunchAsync(new BrowserTypeLaunchOptions
{
    Headless = false,
});
var context = await browser.NewContextAsync();
// Open new page
var page = await context.NewPageAsync();
// Go to https://playwright.dev/dotnet/
await page.GotoAsync("https://playwright.dev/dotnet/");
// Click section >> text=.NET
await page.ClickAsync("section >> text=.NET");
// Assert.Equal("https://playwright.dev/dotnet/docs/intro/", page.Url);
I modified the code little bit and changed it like this.
[Test]
public async Task VerifyDotNetLinkClickRedirectingToDotNetIntroPage()
{
    using var playwright = await Playwright.CreateAsync();
    await using var browser = await playwright.Chromium.LaunchAsync();
    var context = await browser.NewContextAsync();
    var page = await context.NewPageAsync();
    await page.GotoAsync("https://playwright.dev/dotnet/");
    await page.ClickAsync("section >> text=.NET");
    Assert.AreNotEqual("https://playwright.dev/dotnet/docs/intro/", page.Url);
}
Next let us deploy the tests to Azure DevOps and run it along with your CI/CD pipeline. For the demo I am running it in the build pipeline. I created a ASP.NET Core build pipeline. And removed all the steps. And then in the pipeline, I am using .NET Core 5.0. Then I am installing the playwright CLI locally. And installing the browsers using playwright install command. And finally executing the tests using dotnet test command. Here is the YAML file.
trigger:
- master

pool:
  vmImage: ubuntu-latest

variables:
  buildConfiguration: 'Release'

steps:
- task: UseDotNet@2
  inputs:
    packageType: 'sdk'
    version: '5.0.301'
- task: DotNetCoreCLI@2
  displayName: New Manifest for tool
  inputs:
    command: custom
    custom: 'new '
    arguments: tool-manifest
- task: DotNetCoreCLI@2
  displayName: Install Playwright CLI
  inputs:
    command: custom
    custom: 'tool '
    arguments: install Microsoft.Playwright.CLI
- task: DotNetCoreCLI@2
  inputs:
    command: 'build'
- task: DotNetCoreCLI@2
  displayName: Run Playwright Install
  inputs:
    command: custom
    custom: 'tool '
    arguments: run playwright install
- task: DotNetCoreCLI@2
  inputs:
    command: 'test'
And here is the build pipeline running on Azure DevOps.
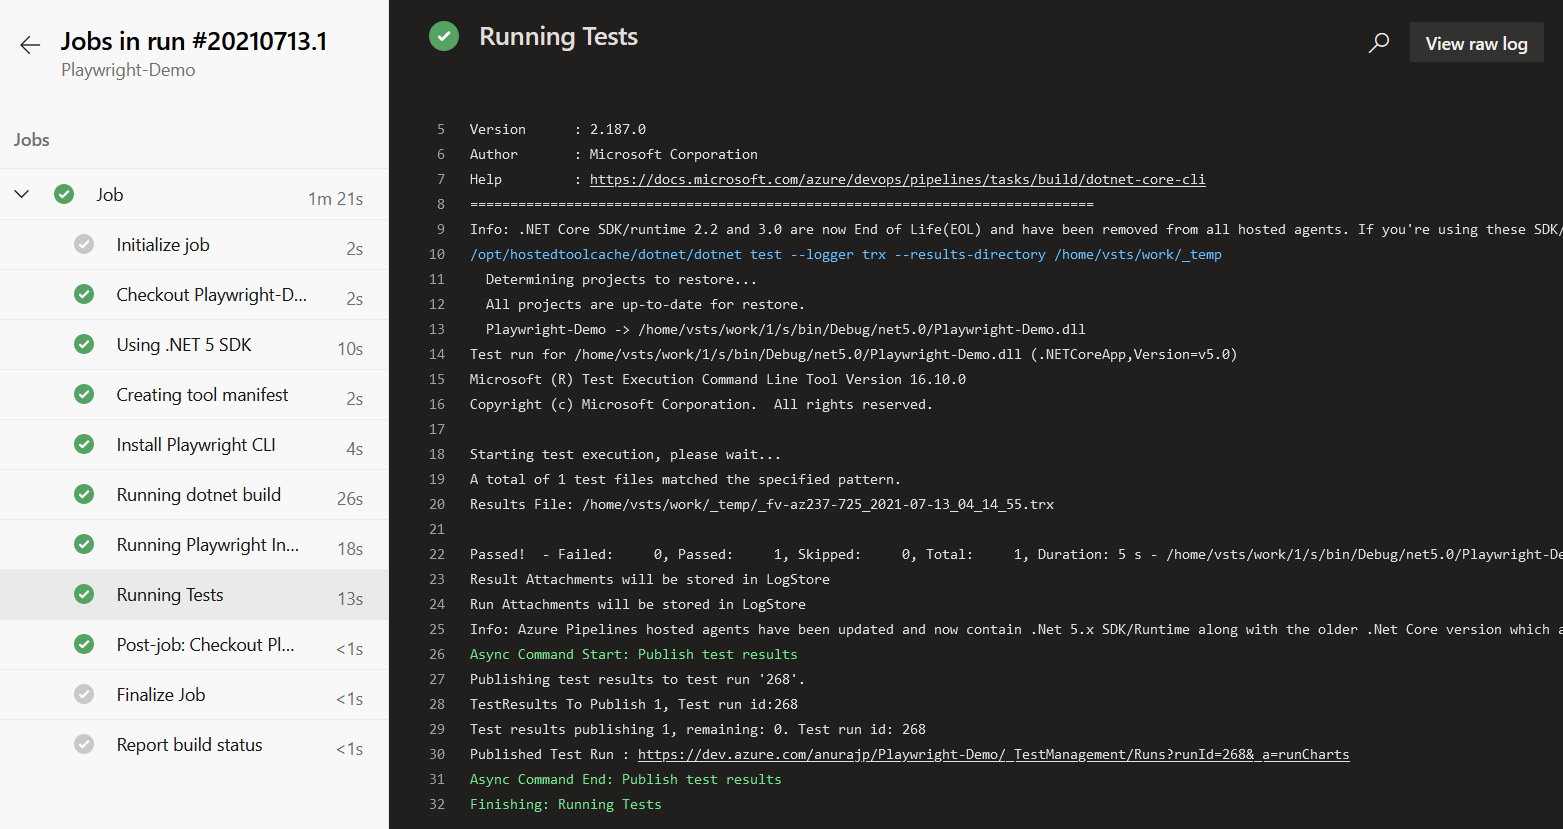
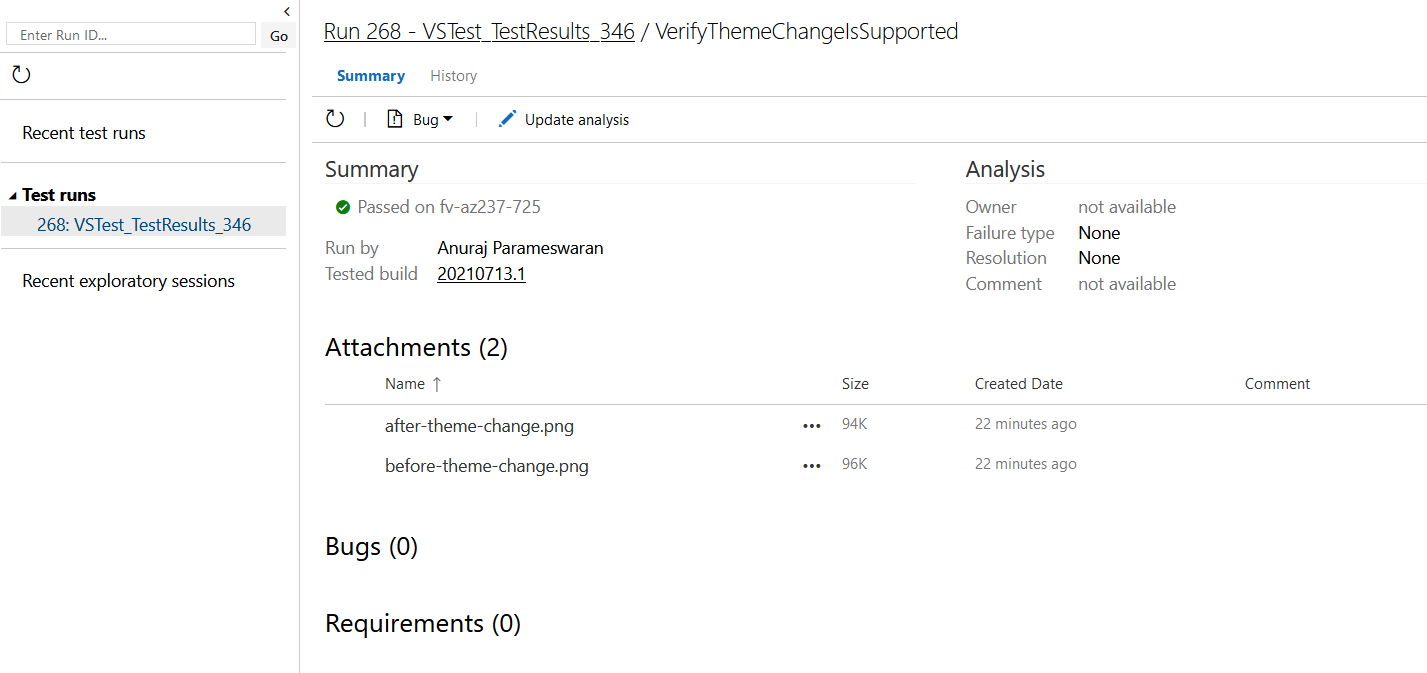
And you will be able to see the Test Results and Screenshots under the Test Plans > Runs, like this.
Using Playwright you will be able to test the webapps and run the tests in Azure DevOps.
Happy Programming :)
Copyright © 2024 Anuraj. Blog content licensed under the Creative Commons CC BY 2.5 | Unless otherwise stated or granted, code samples licensed under the MIT license. This is a personal blog. The opinions expressed here represent my own and not those of my employer. Powered by Jekyll. Hosted with ❤ by GitHub