Getting started with Azure Bicep
May 15, 2021 by Anuraj
Azure ARM
This article will discuss about Azure Bicep and how to use it for provisioning Azure resources. Bicep is a declarative language for describing and deploying Azure resources. Bicep is a Domain Specific Language (DSL) for deploying Azure resources declaratively. It aims to drastically simplify the authoring experience with a cleaner syntax, improved type safety, and better support for modularity and code re-use. Bicep code is transpiled to standard ARM Template JSON files, which effectively treats the ARM Template as an Intermediate Language (IL).
To get started you need to install Bicep CLI. You can do this with the help of Azure CLI. You can install Bicep CLI with the command az bicep install. Once you install you will be able to use Bicep with bicep command. Due to some issues in the Azure CLI installation, I installed Bicep manually. You can find more information on installing Bicep with PowerShell here. There a Bicep extension available for VS Code, which helps you to create Bicep files with language intellisense and provides visualization of resources.
So before getting into details about Bicep, let us explore how you can create a storage account with ARM templates.
{
    "$schema": "https://schema.management.azure.com/schemas/2019-04-01/deploymentTemplate.json#",
    "contentVersion": "1.0.0.0",
    "parameters": {
        "storageName": {
            "type": "string",
            "minLength": 3,
            "maxLength": 24,
            "defaultValue": "dotnetthoughtsdemo"
        },
        "storageSkus": {
            "type": "string",
            "allowedValues": [
                "Standard_LRS",
                "Standard_GRS",
                "Standard_RAGRS",
                "Standard_ZRS",
                "Premium_LRS",
                "Premium_ZRS",
                "Premium_GZRS",
                "Standard_RAGZRS"
            ]
        }
    },
    "functions": [],
    "variables": {},
    "resources": [
        {
            "name": "[parameters('storageName')]",
            "type": "Microsoft.Storage/storageAccounts",
            "apiVersion": "2019-06-01",
            "tags": {
                "displayName": "dotnetthoughtsdemo"
            },
            "location": "[resourceGroup().location]",
            "kind": "StorageV2",
            "sku": {
                "name": "[parameters('storageSkus')]",
                "tier": "Premium"
            }
        }
    ],
    "outputs": {}
}
In this above ARM template, you’re creating an Azure Storage Account. You can do this by executing the following command - az deployment group create --resource-group demo-rg --template-file storage.json. Next lets see the same code in Azure Bicep. You can convert an ARM template to Bicep using Bicep CLI - bicep decompile .\storage.json command, which will be something like this.
@minLength(3)
@maxLength(24)
param storageName string = 'dotnetthoughtsdemo'

@allowed([
  'Standard_LRS'
  'Standard_GRS'
  'Standard_RAGRS'
  'Standard_ZRS'
  'Premium_LRS'
  'Premium_ZRS'
  'Premium_GZRS'
  'Standard_RAGZRS'
])
param storageSkus string

resource storageName_resource 'Microsoft.Storage/storageAccounts@2019-06-01' = {
  name: storageName
  tags: {
    displayName: 'dotnetthoughtsdemo'
  }
  location: resourceGroup().location
  kind: 'StorageV2'
  sku: {
    name: storageSkus
    tier: 'Premium'
  }
}
You can provision resources using Azure Bicep with the command - az deployment group create --resource-group demo-rg --template-file storage.bicep. Both of them helps us to provision Azure Resources. With Bicep you need to write only less code compare to ARM templates. Lets explore some Bicep templates.
Here is the Bicep template for Redis with default values.
resource redisCache 'Microsoft.Cache/Redis@2019-07-01' = {
  name: 'dotnetthoughts'
  location: resourceGroup().location
  properties: {
    sku: {
      name: 'Basic'
      family: 'C'
      capacity: 0
    }
  }
}
In this the redisCache is the name for the resource in the Bicep file - for internal reference purposes. The Microsoft.Cache/Redis@2019-07-01 is the resource type and the values that can be configured. And the name,family and capacity properties are based on the resource you’re configuring. In this example - A Basic C0 Redis resource will be provisioned with the name dotnetthoughts when you deploy this Bicep file. Resource location will be based on the Resource Group. You can parameterize these values as well.
Here is an example of the same Bicep file with parameterized inputs.
param redisCacheName string
resource redisCache 'Microsoft.Cache/Redis@2019-07-01' = {
  name: redisCacheName
  location: resourceGroup().location
  properties: {
    sku: {
      name: 'Basic'
      family: 'C'
      capacity: 0
    }
  }
}
And you can add some validations and allowed values around it, like this.
param redisCacheName string
@allowed([
'C'
'P'
])
param redisfamily string = 'C'
@allowed([
'Basic'
'Standard'
'Premium'
])
param redisCacheType string = 'Basic'
resource redisCache 'Microsoft.Cache/Redis@2019-07-01' = {
name: redisCacheName
location: resourceGroup().location
properties: {
sku: {
name: redisCacheType
family: redisfamily
capacity: 0
}
}
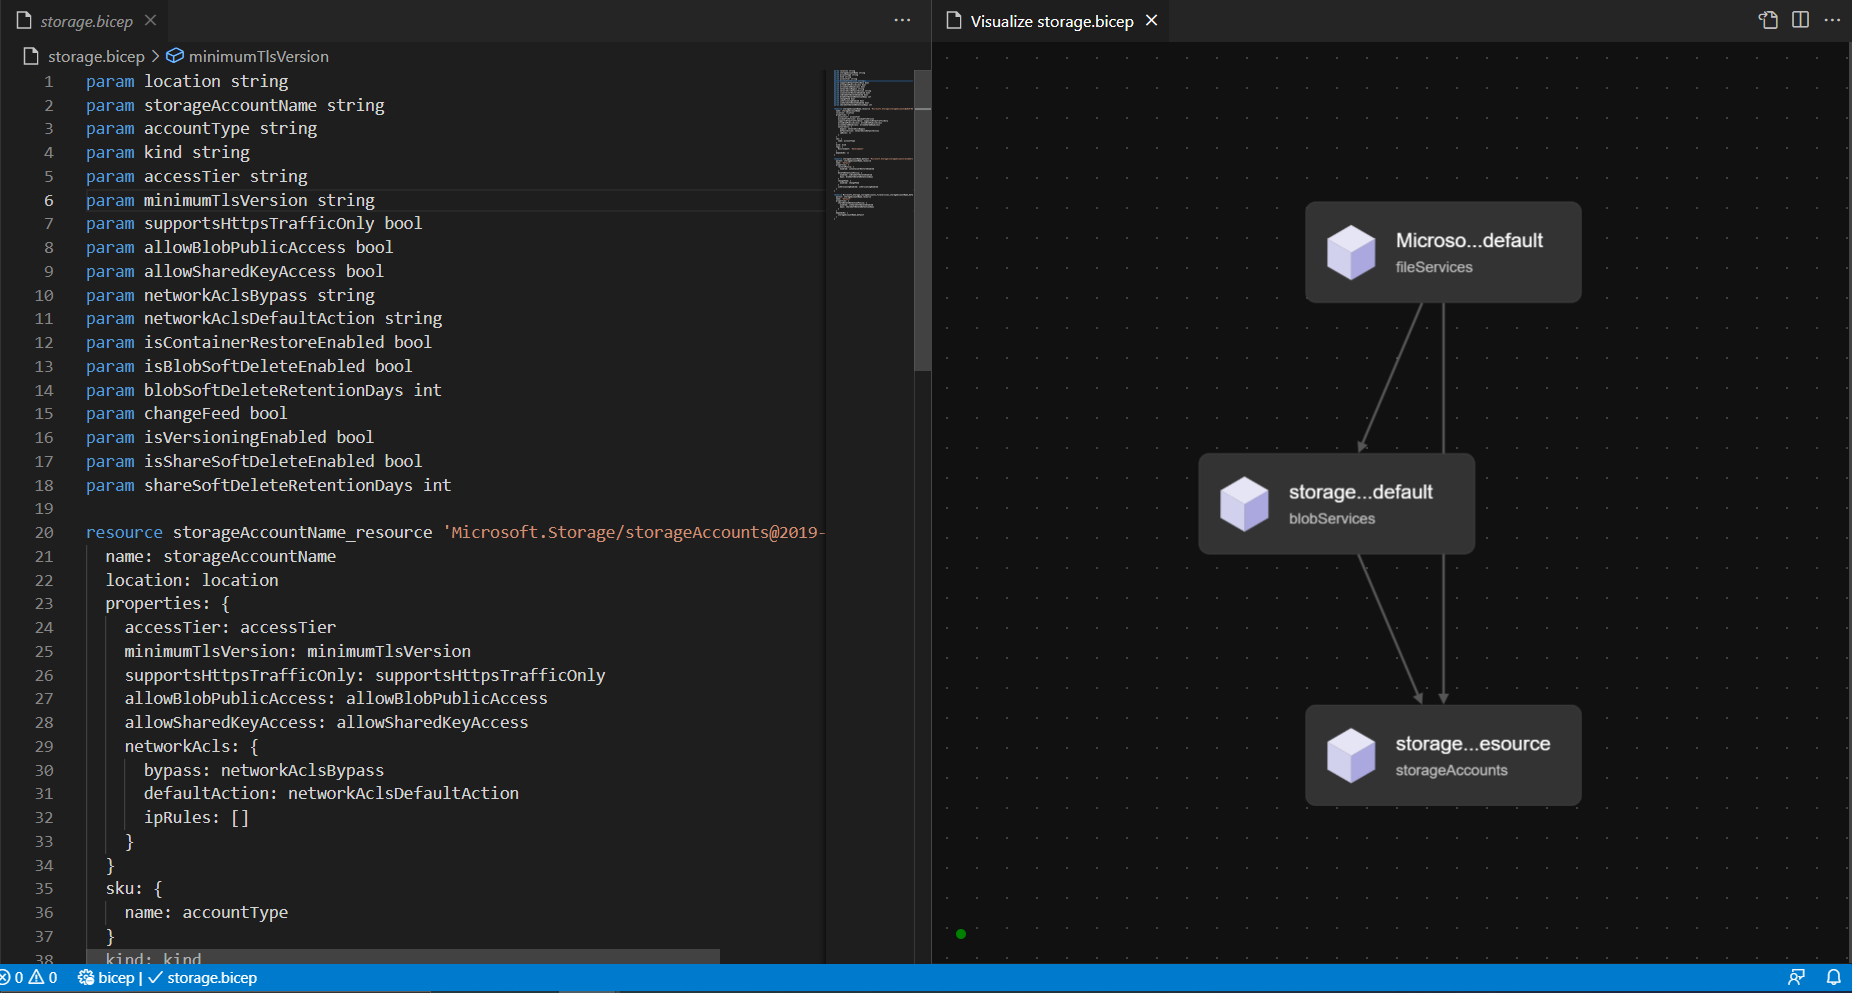
}This way you will be able to create and provision resources with Azure Bicep. The VS Code extension comes with lot of features like Intellisense, Snippets and Visualization of resources. Here is an example of a Storage Account Bicep file in VS Code.
Here are few resources which will help you to explore more on Azure Bicep.
- What is Bicep (Preview)?
- Tutorial: Create and deploy first Azure Resource Manager Bicep file
- Quickstart: Create Bicep files with Visual Studio Code
- Bicep Playground
Happy Programming :)
Copyright © 2024 Anuraj. Blog content licensed under the Creative Commons CC BY 2.5 | Unless otherwise stated or granted, code samples licensed under the MIT license. This is a personal blog. The opinions expressed here represent my own and not those of my employer. Powered by Jekyll. Hosted with ❤ by GitHub