Running Playwright on Azure Functions
December 10, 2020 by Anuraj
Azure Playwright Serverless Nodejs
This post is about Running Playwright on Azure Functions and deploying it to Azure. Playwright is a Node.js library to automate Chromium, Firefox and WebKit with a single API. Playwright is built to enable cross-browser web automation that is ever-green, capable, reliable and fast. Since it is a Node.js library I am creating this azure function in Javascript. This function will read a URL as input parameter and converts that URL into a PDF file. So first I am creating an Azure function with Javascript.
I am creating the function using VSCode. I am created a function using Javascript and HttpTrigger. Next I am installing the Playwright package using the command - npm install playwright. this command installs Playwright and browser binaries for Chromium, Firefox and WebKit. And I am installing playwright-chromium as well, so that I can access the library in the code.
Here is my package.json file
{
  "name": "url2pdf",
  "version": "1.0.0",
  "description": "",
  "scripts": {
    "start": "func start",
    "test": "echo \"No tests yet...\""
  },
  "dependencies": {
    "playwright": "^1.6.2",
    "playwright-chromium": "^1.6.2"
  },
  "devDependencies": {}
}
Next modify the index.js file like this.
const { chromium } = require("playwright-chromium");

module.exports = async function (context, req) {
    const url = req.query.url || "https://dotnetthoughts.net/";
    const browser = await chromium.launch();
    const page = await browser.newPage();
    await page.emulateMedia('screen');
    await page.goto(url);
    const screenshotBuffer = await page.pdf({ format: 'A4' })
    await browser.close();
    context.res = {
        body: screenshotBuffer,
        headers: {
            "content-type": "application/pdf",
            "Content-disposition": "attachment; filename=" + url + ".pdf"
        }
    };
}
This code will launch chrome instance, open a new tab, navigate to the URL in the request. Once navigation completed, it will convert the page to pdf and returns the bytes to response as PDF file.
Next I am deploying it to Azure. To do that first you need to install the Azure Extension for VS Code and Connect to your subscription.
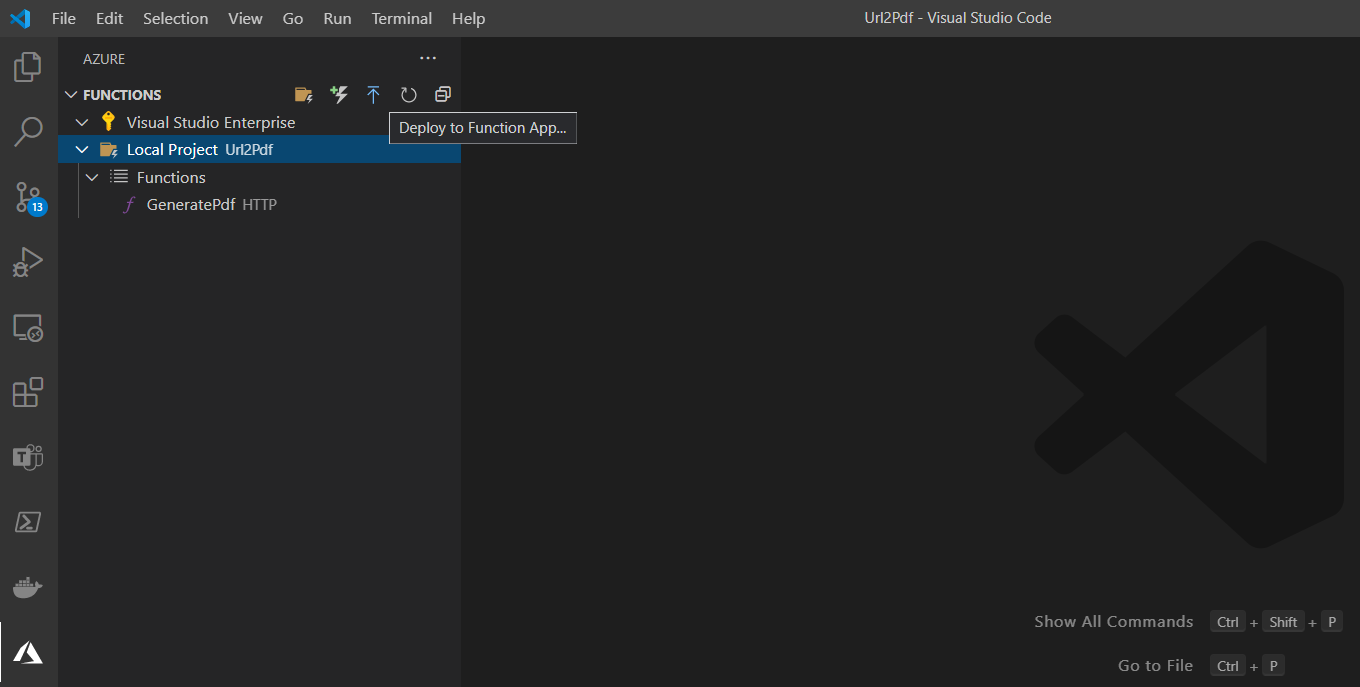
This will connect the subscription and display your Function as Local Project. You can click on the Blue icon - Deploy to Function app to deploy it to Azure, you can choose your existing function app or you can create one. Before deploying it to Azure you need to make sure you’re changing VS Code settings to run npm install on the server instead of development machine. To do this, select the Azure Function extension and click on the settings.

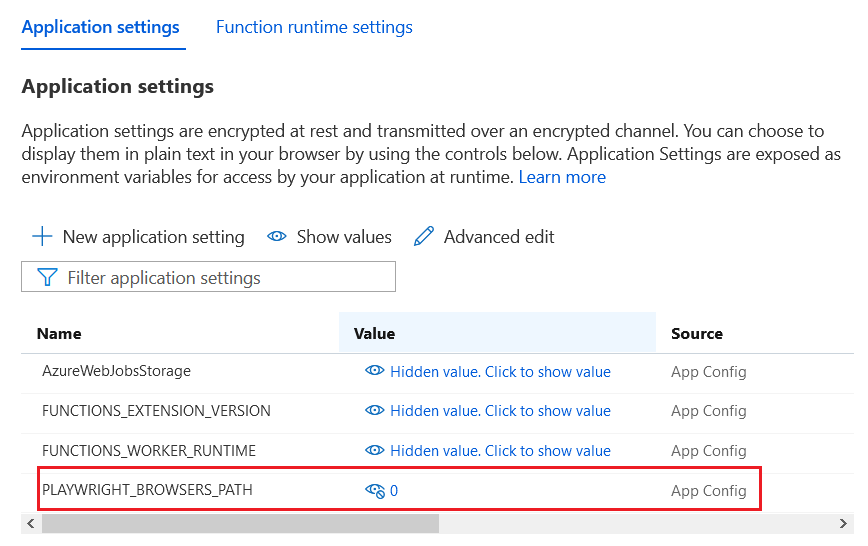
And select the option - Azure Functions: SCM Do Build During Deployment - this will build the project on server instead of client. It is applicable only for Linux Function apps. So next I will be clicking on the Deploy to Function app icon, which will prompt few questions and which will help you to create the azure function. I choose the Create new Function app in Azure Advanced option, provided a unique name, choose Node.js 12 LTS as the runtime stack, Linux as the OS, Consumption hosting plan, created new resource group, storage account and I added an application insights resource. It will deploy the function to Azure. But it might not work as expected. Because Playwright downloads Chromium to a location outside the function app’s folder. To include Chromium in the build artifacts, we need to configure Playwright to install Chromium in the app’s node_modules folder. To do this, we need to create an app setting named PLAYWRIGHT_BROWSERS_PATH with a value of 0 in the function app in Azure. This setting is used by Playwright at run-time to locate Chromium in node_modules. If you’re creating the function first from portal than creating it while deployment, you can avoid deploying it again after this change.
You can also remove the preDeployTask and postDeployTask from .vscode/settings.json file. Here is the updated settings.json
{
    "azureFunctions.deploySubpath": ".",
    "azureFunctions.projectLanguage": "JavaScript",
    "azureFunctions.projectRuntime": "~3",
    "debug.internalConsoleOptions": "neverOpen"
}
Now deploy it again. This will show a prompt about over writing the deployment, select Deploy option. It will deploy the app and provide the URL of the function. While deploying I found one issue - The Azure function extension setting - SCM Do Build During Deployment was not working. So I had to include it in the settings.json like this.
{
    "azureFunctions.deploySubpath": ".",
    "azureFunctions.projectLanguage": "JavaScript",
    "azureFunctions.projectRuntime": "~3",
    "debug.internalConsoleOptions": "neverOpen",
    "azureFunctions.scmDoBuildDuringDeployment": true
}
Now browse the function app with a URL which will download a PDF file of the URL.
Happy Programming :)
Copyright © 2024 Anuraj. Blog content licensed under the Creative Commons CC BY 2.5 | Unless otherwise stated or granted, code samples licensed under the MIT license. This is a personal blog. The opinions expressed here represent my own and not those of my employer. Powered by Jekyll. Hosted with ❤ by GitHub