Securing Your Web API Using Azure Active Directory
December 03, 2020 by Anuraj
Azure WebApi AspNetCore
This post is about securing your asp.net core web api applications using Azure Active Directory. First let’s create an Azure Active Directory application which helps you to protect the application.
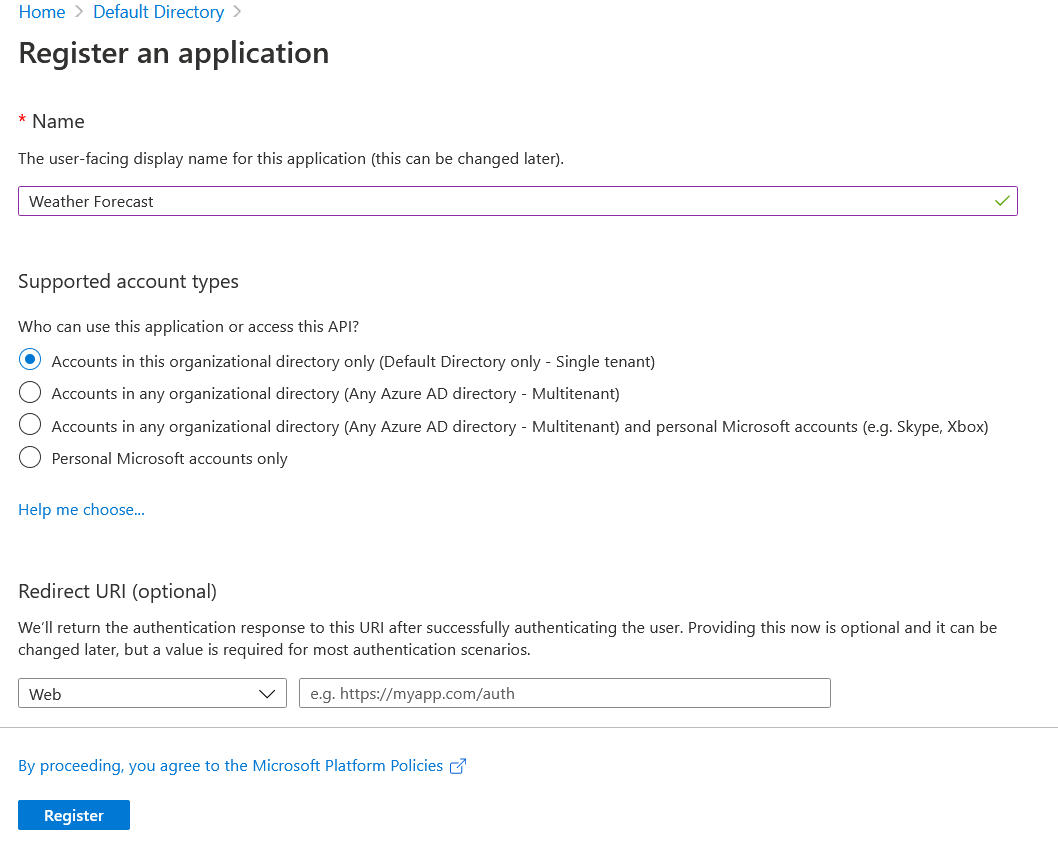
Open Azure Portal, Select Azure Active Directory, and select App registrations from the blade. Then click on the + New Registration. Provide a name for the application which you can change later. Since I am trying to protect the Weather Forecast API, I provided the name Weather Forecast.
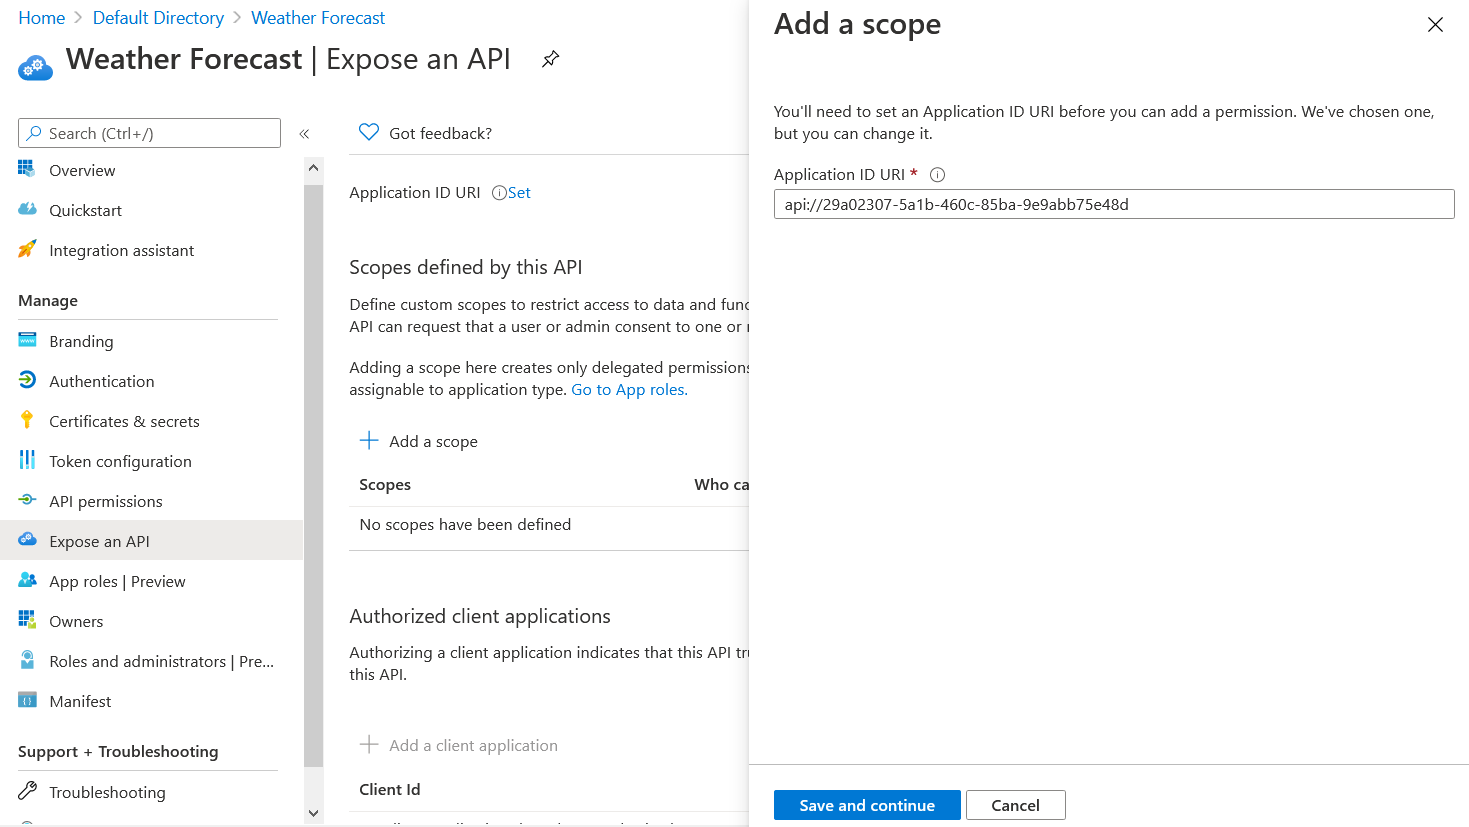
Next, we need to create a scope - for Weather Forecast API, we need only Read scope. For that select the Expose an API option from the Weather Forecast application. Click on the + Add Scope button. And it will show an Application Id URL - we can change it if required, but I am using the default one.
Click on the Save and Continue button. On the next screen, set the scope name as WeatherForecast.Read, select Admins and Users for the Who can consent? option. And set the display name and description for Admin and User consent screens.
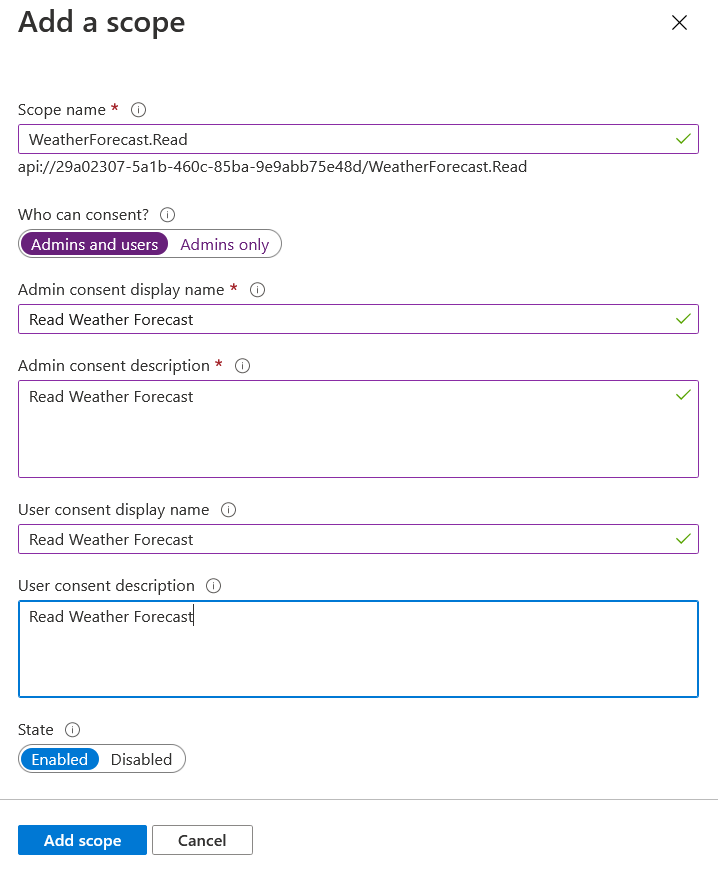
And click on the Add Scope button to complete the process.
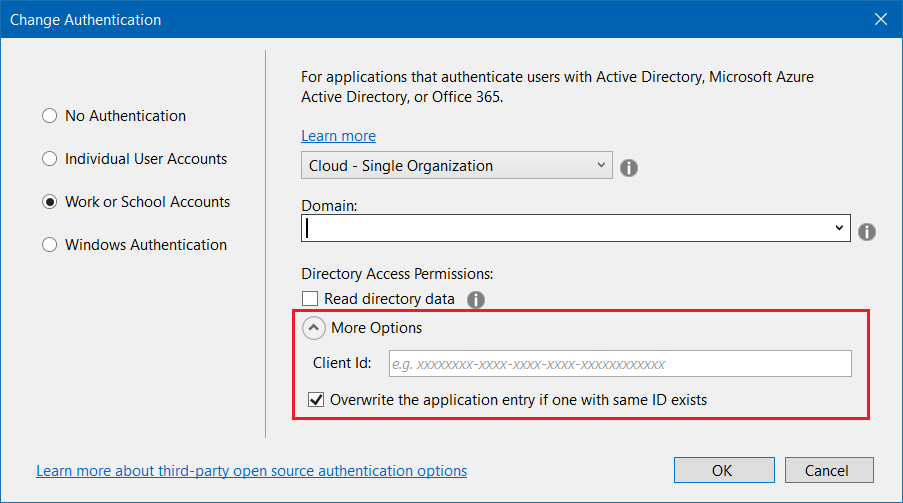
Now we can create the Web API application. I am creating a ASP.NET Core Web API application using Visual Studio 2019. And change the Authentication mode, and select Work or School Accounts and select Cloud . Next you need to configure Domain - you can get it from Azure Active Directory overview page. Next you need to select Overwrite the application entry if one with same ID exists checkbox and Client Id and App Id URI, from the App Registration overview page, and click OK.
Next click on Create. This will take some time. Now let us explore the code generated by Visual Studio. Here is the project file.
<Project Sdk="Microsoft.NET.Sdk.Web">

  <PropertyGroup>
    <TargetFramework>net5.0</TargetFramework>
    <UserSecretsId>aspnet-WebApiAuth_Server-8d185841-534d-47ae-b55b-495c7284befa</UserSecretsId>
  </PropertyGroup>

  <ItemGroup>
    <PackageReference Include="Microsoft.AspNetCore.Authentication.JwtBearer" Version="5.0.0" NoWarn="NU1605" />
    <PackageReference Include="Microsoft.AspNetCore.Authentication.OpenIdConnect" Version="5.0.0" NoWarn="NU1605" />
    <PackageReference Include="Microsoft.Identity.Web" Version="1.1.0"/>
    <PackageReference Include="Swashbuckle.AspNetCore" Version="5.6.3" />
  </ItemGroup>

</Project>
The Microsoft.Identity.Web package is the library which helps us to integrate Azure AD with ASP.NET Core application. The other change is in the Startup class, ConfigureServices method.
public void ConfigureServices(IServiceCollection services)
{
    services.AddAuthentication(JwtBearerDefaults.AuthenticationScheme)
        .AddMicrosoftIdentityWebApi(Configuration.GetSection("AzureAd"));

    services.AddControllers();
    services.AddSwaggerGen(c =>
    {
        c.SwaggerDoc("v1", new OpenApiInfo { Title = "WebApiAuth", Version = "v1" });
    });
}
In this method we are adding a JWT Authentication middleware and AddMicrosoftIdentityWebApi extension method which will take the Azure AD Configuration settings and make our API app to authenticate against the Azure AD service. And the configuration values from appsettings.json file.
{
  "AzureAd": {
    "Instance": "https://login.microsoftonline.com/",
    "Domain": "Domain name from Azure AD page",
    "TenantId": "Tenant Id from App Overview Page",
    "ClientId": "Application Id from App Overview Page",
    "CallbackPath": "/signin-oidc"
  },
  "Logging": {
    "LogLevel": {
      "Default": "Information",
      "Microsoft": "Warning",
      "Microsoft.Hosting.Lifetime": "Information"
    }
  },
  "AllowedHosts": "*"
}
In the controller, there is an Authorize attribute which will throw a 401 is the request is not authenticated. And in the Get() method there is a method HttpContext.VerifyUserHasAnyAcceptedScope - which helps to enable authorization to your web API. We need to modify this method and instead of putting the default user_impersonation scope, we need to provide the scope we created while creating the App Scope.
Here is the updated code.
[Authorize]
[ApiController]
[Route("[controller]")]
public class WeatherForecastController : ControllerBase
{
    private static readonly string[] Summaries = new[]
    {
        "Freezing", "Bracing", "Chilly", "Cool", "Mild", "Warm", "Balmy", "Hot", "Sweltering", "Scorching"
    };

    private readonly ILogger<WeatherForecastController> _logger;

    static readonly string[] scopeRequiredByApi = new string[] { "WeatherForecast.Read" };

    public WeatherForecastController(ILogger<WeatherForecastController> logger)
    {
        _logger = logger;
    }

    [HttpGet]
    public IEnumerable<WeatherForecast> Get()
    {
        HttpContext.VerifyUserHasAnyAcceptedScope(scopeRequiredByApi);

        var rng = new Random();
        return Enumerable.Range(1, 5).Select(index => new WeatherForecast
        {
            Date = DateTime.Now.AddDays(index),
            TemperatureC = rng.Next(-20, 55),
            Summary = Summaries[rng.Next(Summaries.Length)]
        })
        .ToArray();
    }
}
Now you’re done with the changes. If you try to access the https://localhost:44363/WeatherForecast (the port number will change, if you’re using VS Code or dotnet CLI it will be 5001) you will get a 401 error.
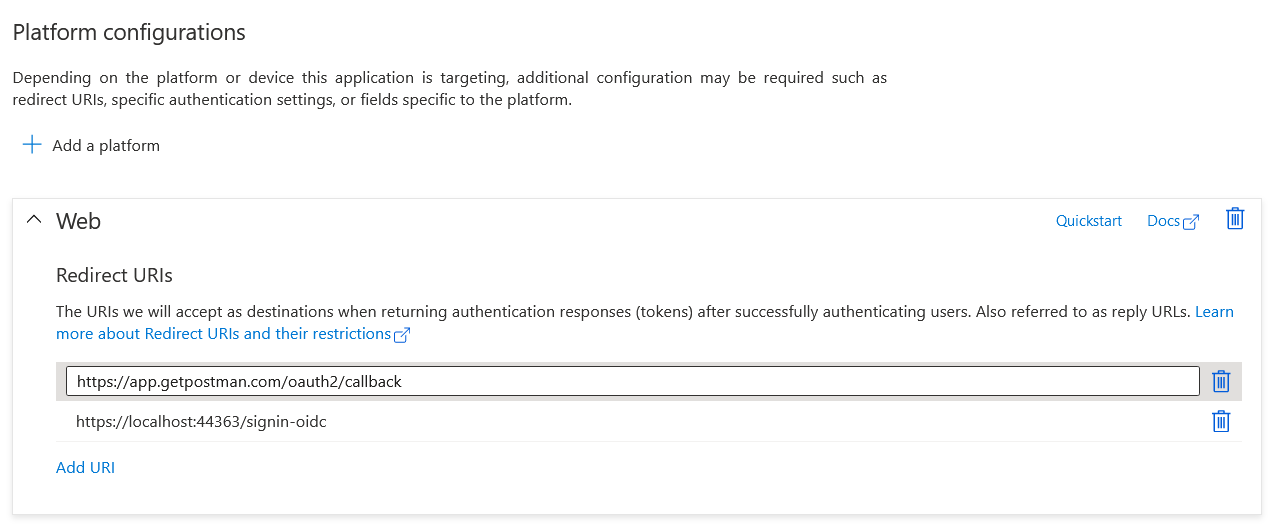
Next we will test the API with Postman. For testing this we need configure callback URLs and Client Secret. Click on the Authentication menu, under Platform configurations, add the Redirect URIs - add the postman callback URL - https://app.getpostman.com/oauth2/callback
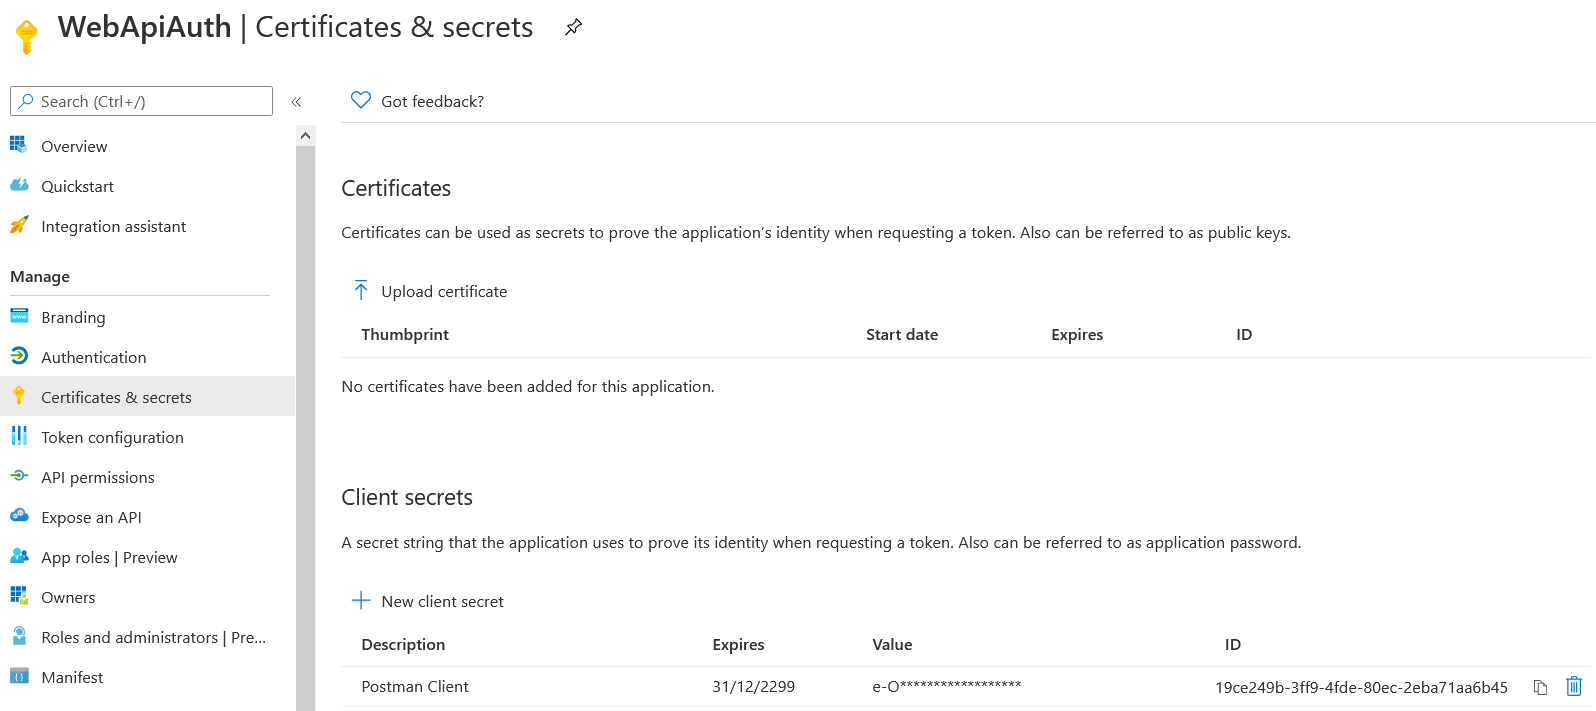
Add you can create the Client secret using the Certificates & secrets menu, and new New Client secret. Set the Description and duration as Never. And click on Create, it will create a token and copy it. You won’t be see it again.
We have completed the configuration for connecting client using Postman. Now open Postman, provide the URL - https://localhost:44363/WeatherForecast, then select the Authorization tab and choose OAuth 2 from the Type list.
The values for Auth URL and Access Token URL you can get from the Endpoint menu of the application.
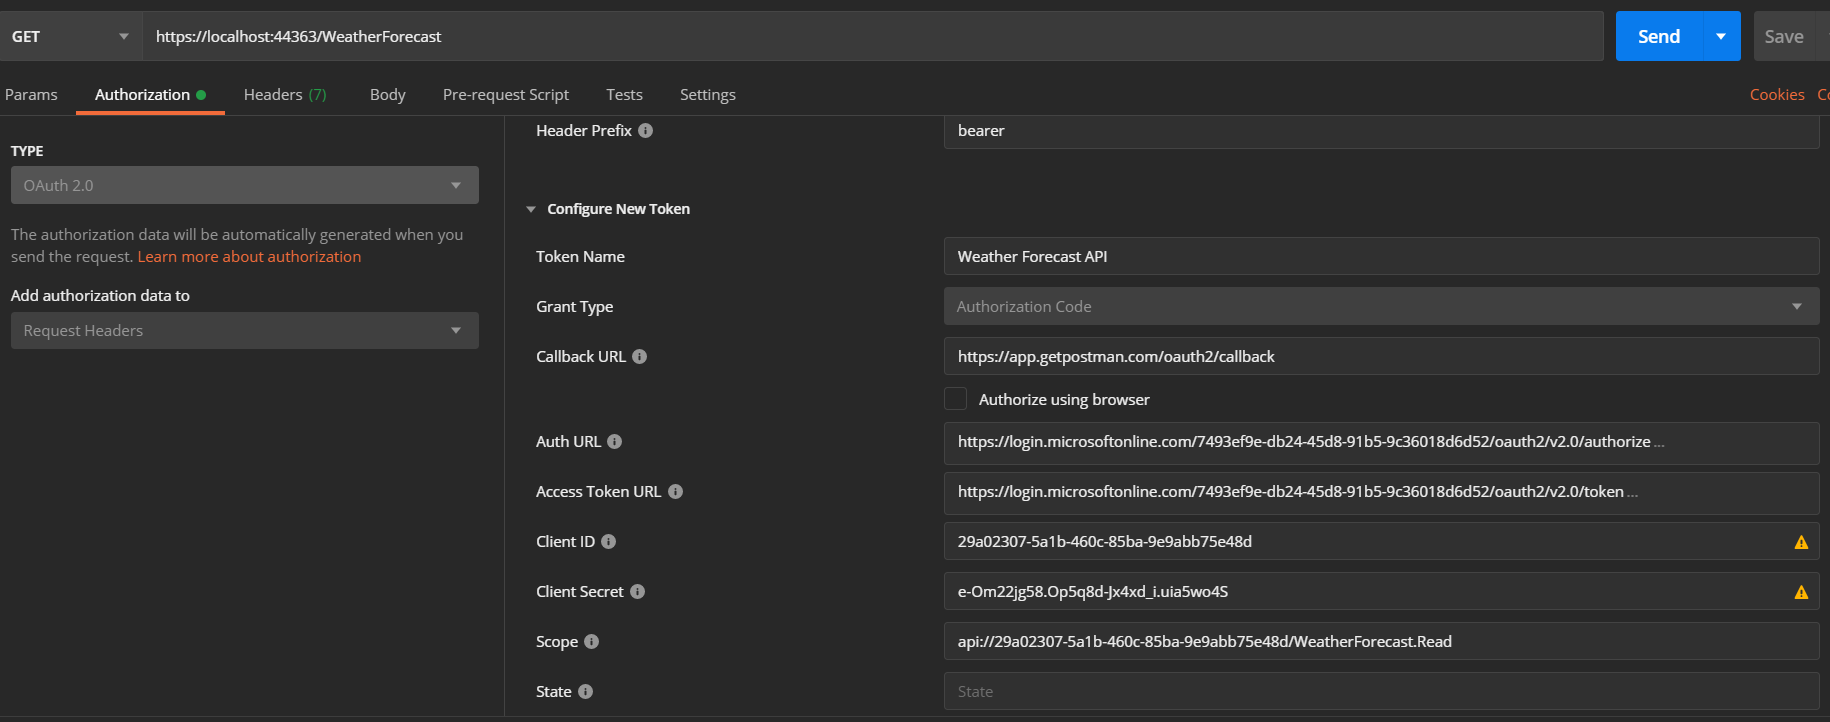
Once you fill up all the fields - you can skip the State field, click on Get New Access Token button. It will popup the Azure AD login dialog and you can login. Once the login is completed, Postman will show a Token, which you can be used to talk to API.
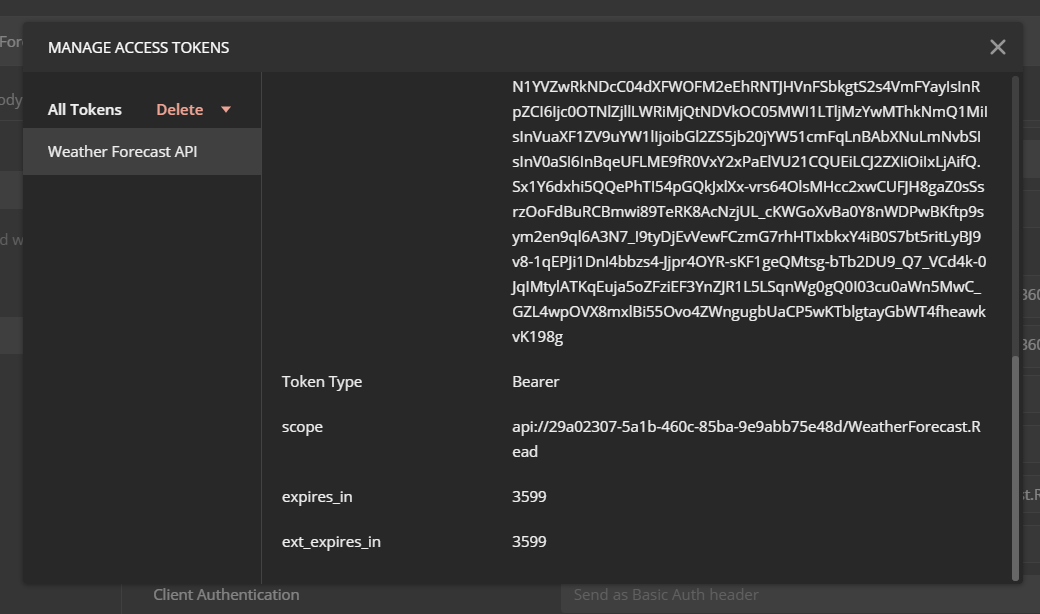
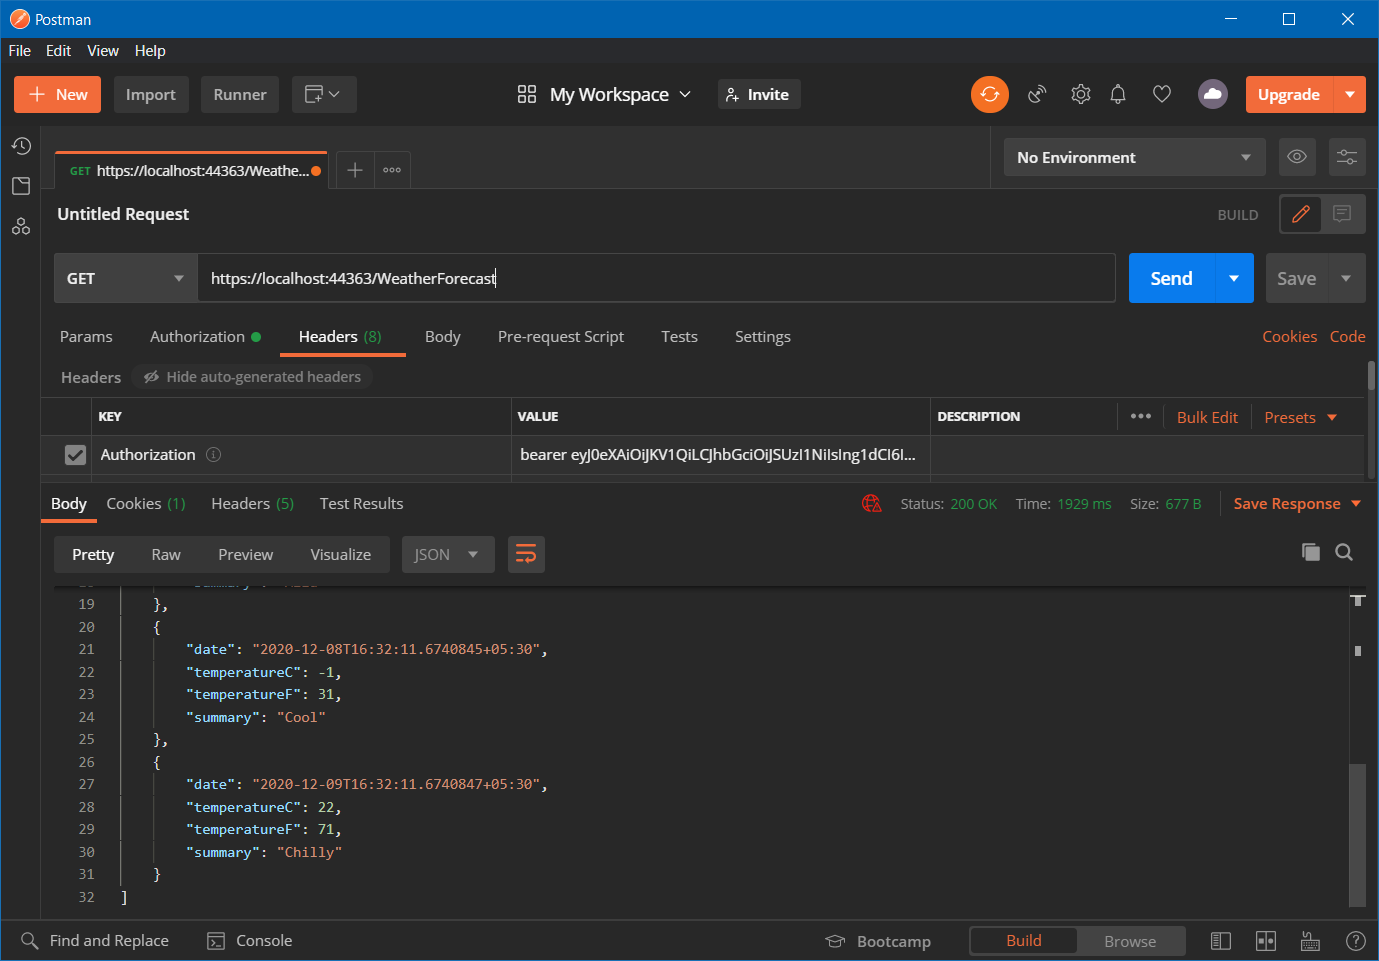
Click on the Use Token button, which will add the Authorization header. Now we can send the GET request which will return the JSON results, like this.
You can create another Azure App registration and use the Client Id instead of using the API client Id and secret. This way you can protect ASP.NET Core Web API using Azure Active Directory.
Happy Programming :)
Copyright © 2024 Anuraj. Blog content licensed under the Creative Commons CC BY 2.5 | Unless otherwise stated or granted, code samples licensed under the MIT license. This is a personal blog. The opinions expressed here represent my own and not those of my employer. Powered by Jekyll. Hosted with ❤ by GitHub