Slack Authentication with ASP.NET Core
July 16, 2016 by Anuraj
ASP.NET Core OAuth 2 Authentication Slack
This post is about implementing authentication with Slack. Similar to Linkedin or GitHub, Slack also supports OAuth 2 protocol for authentication. In this post, for authenticating a user against slack, the generic OAuth middleware is used. To use OAuth middleware you require few details about the OAuth provider.
- A Client ID and Client Secret which is typically available from service’s Developer Portal or similar service.
- The URL for the service’s OAuth2 Authorization endpoint.
- The URL for the service’s OAuth2 Token endpoint.
- Optionally a URL which will allow you to retrieve the user information for the authenticated user from the service.
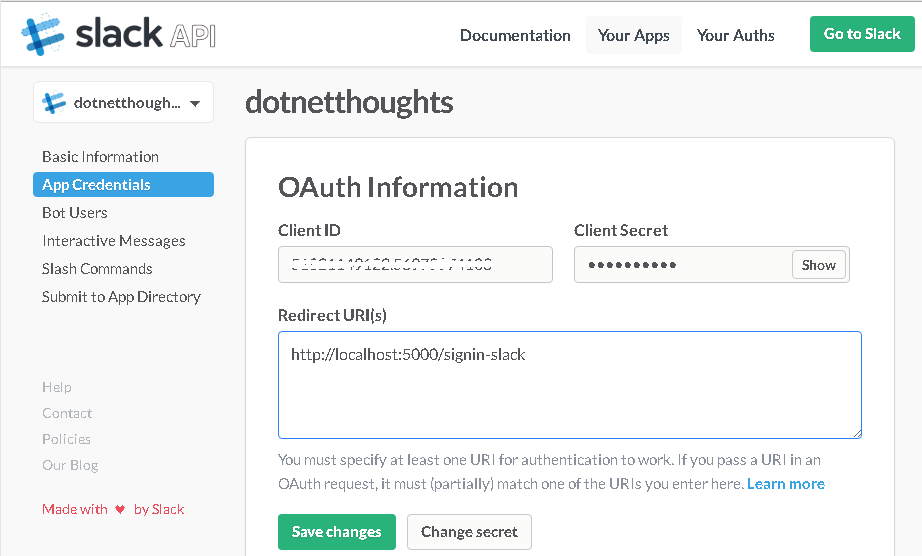
For slack you can get the Client Id and Client Secret from the apps page. If you haven’t created an app you need to create it first. The return uri in this configuration and in our code should be same, otherwise slack authentication will not work.
And here is the other endpoints.
- OAuth2 Authorization Endpoint - https://slack.com/oauth/authorize
- OAuth2 Token Endpoint - https://slack.com/api/oauth.acces
- User Information Endpoint - https://slack.com/api/users.identity - with token as the query string.
Instead of hard coding the Client Id and Client Secret in the code, it is better to read from configuration file. So you can create appsettings.json file and read the values using configuraion. Here is the appsettings.json file.
{
  "Logging": {
    "IncludeScopes": false,
    "LogLevel": {
      "Default": "Debug",
      "System": "Information",
      "Microsoft": "Information"
    }
  },
  "Slack" : {
    "ClientId" : "51821149122e4b024c48def5ede",
    "ClientSecret" : "5182114912254c9f8f111af426f"
  }
}
To use generic oauth middleware first you need to configure project.json file with the required references.
"dependencies": {
  "Microsoft.NETCore.App": {
    "version": "1.0.0",
    "type": "platform"
  },
  "Microsoft.AspNetCore.Diagnostics": "1.0.0",
  "Microsoft.AspNetCore.Mvc": "1.0.0",
  "Microsoft.AspNetCore.Razor.Tools": {
    "version": "1.0.0-preview2-final",
    "type": "build"
  },
  "Microsoft.AspNetCore.Server.IISIntegration": "1.0.0",
  "Microsoft.AspNetCore.Server.Kestrel": "1.0.0",
  "Microsoft.AspNetCore.StaticFiles": "1.0.0",
  "Microsoft.Extensions.Configuration.EnvironmentVariables": "1.0.0",
  "Microsoft.Extensions.Configuration.Json": "1.0.0",
  "Microsoft.Extensions.Configuration.CommandLine": "1.0.0",
  "Microsoft.Extensions.Logging": "1.0.0",
  "Microsoft.Extensions.Logging.Console": "1.0.0",
  "Microsoft.Extensions.Logging.Debug": "1.0.0",
  "Microsoft.Extensions.Options.ConfigurationExtensions": "1.0.0",
  "Microsoft.VisualStudio.Web.BrowserLink.Loader": "14.0.0",
  "Microsoft.AspNetCore.Authentication.Cookies": "1.0.0",
  "Microsoft.AspNetCore.Authentication.OAuth": "1.0.0"
}
Now you need to run the “dotnet restore” command to restore the packages. Once the packages restored successfully, you can modify the startup file to implement authentication. Here is the ConfigureServices, which will register the authentication services.
public void ConfigureServices(IServiceCollection services)
{
    services.AddAuthentication(options =>
        options.SignInScheme = CookieAuthenticationDefaults.AuthenticationScheme);
    services.AddMvc();
}
And in the Configure method you need to register the Cookie and OAuth middlewares. Here is the Configure method.
app.UseCookieAuthentication(new CookieAuthenticationOptions()
{
    AutomaticAuthenticate = true,
    AutomaticChallenge = true,
    LoginPath = new PathString("/login"),
    LogoutPath = new PathString("/logout")
});

app.UseOAuthAuthentication(new OAuthOptions
{
    AuthenticationScheme = "Slack",
    ClientId = Configuration["Slack:ClientId"],
    ClientSecret = Configuration["Slack:ClientSecret"],
    CallbackPath = new PathString("/signin-slack"),
    AuthorizationEndpoint = "https://slack.com/oauth/authorize",
    TokenEndpoint = "https://slack.com/api/oauth.access",
    UserInformationEndpoint = "https://slack.com/api/users.identity?token=",
    Scope = { "identity.basic" },
    Events = new OAuthEvents
    {
        OnCreatingTicket = async context =>
        {
            var request = new HttpRequestMessage(HttpMethod.Get, context.Options.UserInformationEndpoint + context.AccessToken);
            var response = await context.Backchannel.SendAsync(request, context.HttpContext.RequestAborted);
            response.EnsureSuccessStatusCode();
            var userObject = JObject.Parse(await response.Content.ReadAsStringAsync());
            var user = userObject.SelectToken("user");
            var userId = user.Value<string>("id");
            if (!string.IsNullOrEmpty(userId))
            {
                context.Identity.AddClaim(new Claim(ClaimTypes.NameIdentifier, userId, ClaimValueTypes.String, context.Options.ClaimsIssuer));
            }
            var fullName = user.Value<string>("name");
            if (!string.IsNullOrEmpty(fullName))
            {
                context.Identity.AddClaim(new Claim(ClaimTypes.Name, fullName, ClaimValueTypes.String, context.Options.ClaimsIssuer));
            }
        }
    }
});
The events property of OAuth middleware is used to create claims, using you can get username / id from the User profile. Unlike other OAuth providers Slack requires the Token to be passed a query string with Token as parameter. So if you look at the code, I am using query string token in the UserInformationEndpoint. You can create Login and Logout methods like this.
app.Map("/login", builder =>
{
    builder.Run(async context =>
    {
        await context.Authentication.ChallengeAsync("Slack",
            properties: new AuthenticationProperties() { RedirectUri = "/" });
    });
});

app.Map("/logout", builder =>
{
    builder.Run(async context =>
    {
        await context.Authentication.SignOutAsync(CookieAuthenticationDefaults.AuthenticationScheme);
        context.Response.Redirect("/");
    });
});
As I don’t have any other login mechanisms in place, I am not using a Account controller or Login view. The login url will issue a challenge to log in with Slack. And logout will Signout the user and redirect to the home page. And the view you can add following code snippet for logging in and logout if not authenticated.
<ul class="nav navbar-nav navbar-right">
@if (User.Identity.IsAuthenticated)
{
<li><a asp-controller="Home" asp-action="UserProfile">Hello @User.Identity.Name!</a></li>
<li><a href="~/logout">Logout</a></li>
}
else
{
<li><a href="~/login">Login</a></li>
}
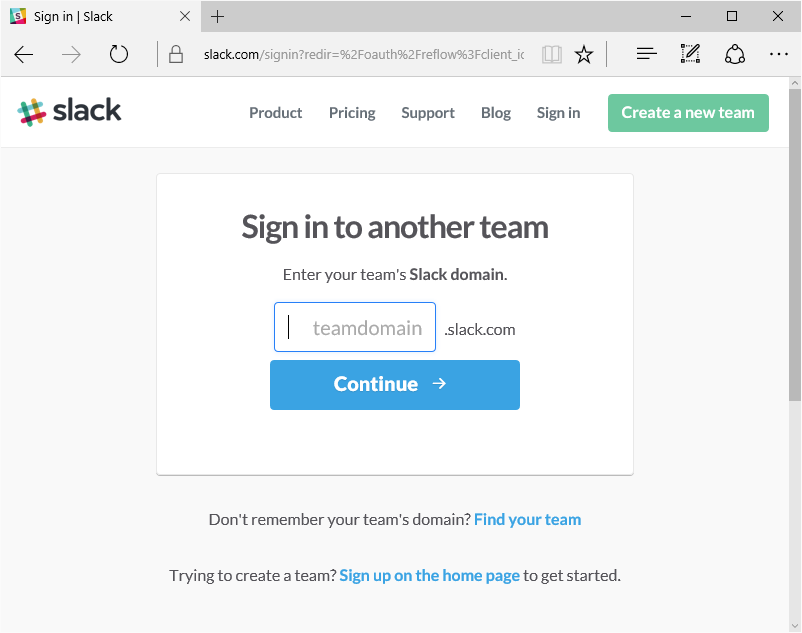
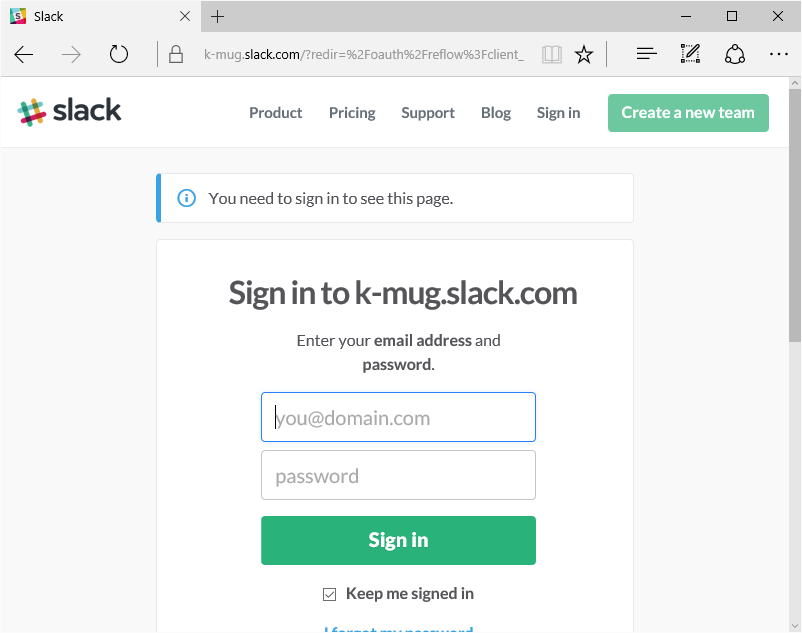
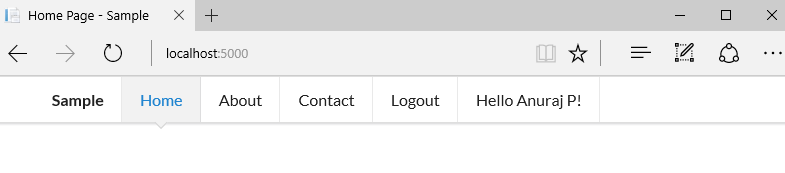
</ul>Here is the screenshots of the Slack authentication in ASP.NET Core.
When user click on login link, which will invoke the login method mapped in Startup.cs
Once user’s team selection completed, the authentication dialog will be presented with username and password fields.
And finally once authentication is completed, it will redirect to the application, and with the Razor view code, it will display user’s name and logout button like this.
You can use the similar steps for Linkedin and Github as well.
Happy Programming :)
Copyright © 2024 Anuraj. Blog content licensed under the Creative Commons CC BY 2.5 | Unless otherwise stated or granted, code samples licensed under the MIT license. This is a personal blog. The opinions expressed here represent my own and not those of my employer. Powered by Jekyll. Hosted with ❤ by GitHub